
Upgrading the Unraid Server
The current Unraid server that’s been running for a while now is a bit limited. I got a good deal on it, don’t get me wrong. At the time, I was able to get an R510 with dual E5620s, and 64GB of RAM, which is plenty for what I need for Unraid.
The problem with this is that it was an 8 bay model, not the 12 bay one that I wanted. My array setup involves two SSDs for cache, and 6 data drives. There is an adapter that lets you plug in two drives internally, but apparently this only exists in the 12 bay model, so my cache drives had to use up two of my 8 hotswap bays. Obviously, it was definitely time for an upgrade.
I’ve been meaning to do this upgrade for months now, and I’ve had a list of parts picked out.
The plan
My end goal here was to upgrade a bunch of things. I wanted to avoid a heavy increase in power, but I didn’t want to take a hit on processing power. I also wanted to jump from DDR3 to DDR4, though that wasn’t necessary, and I wanted more drive bays to expand the array.

As far as internals go, I don’t do a lot of heavy processing use on Unraid, so my goal was to save some power here. I settled on the E5-2630L v3. Being an L class processor, it’s only 55W, as opposed to the 80W TDP of the E5620. And because of the newer processor, it’s also more than double the performance, and somehow also twice the thread count, while still being 50W less for a dual socket system.
Since we’ve settled on the 2011-3 socket, this narrows down the motherboards we can use. I settled for the Supermicro X10 line, and ended up picking out the X10DRH-iT. This board is a dual socket 2011-3, with support for up to 1TB of RAM. It’s got all the good stuff, too. IPMI, dual 10gig Ethernet, and 9 USB ports. 4 of these are 2.0 (2 in the back, 2 via header), and 5 of them are 3.0 (2 in back, 2 via header, and one internal).
The chassis I’ve been looking at for quite a while now is the Supermicro 847. This thing is a beast that manages to cram 36 3.5" bays into a 4U form factor. There’s 24 in the front, and 12 in the back. It supports up to E-ATX motherboards, with room for 7 expansion slots. In my case, all 7 of these are low profile, though there’s a variant that has some full height slots as well.
To top it all off, I need a way to hook these bays up to the motherboard. This particular model has the backplane with the built in SAS expander, so instead of having a bunch of SFF-8087 connectors each running 4 drives, I get to use one. This is worse for performance, but given that Unraid doesn’t typically spin up drives it doesn’t need to spin up, the 24Gb/s of a single SFF-8087 connector won’t be a bottleneck anyway. The wonderful part of the SAS expander is that it means I don’t have to worry about how to hook up 9 SFF-8087 cables, meaning I can settle for one H310 in IT mode. This card is Dell branded, but it’s an LSI 9211-8i under the hood. The Dell versions, using their firmware, tend to be cheaper, so we’re going with a Dell card to save a bit of money.
A word about SAS expanders
This chassis has 36 drive bays in it. This particular variant that I’m using has the BPN-SAS2-846EL1 and BPN-SAS2-826EL1 backplanes, which have a built in SAS expander. The A variant (as opposed to EL1 and EL2) does not. In some ways, this is good, because the SFF-8087 connectors deliver 4 lanes of 6Gb/s, for a total of 24Gb/s throughput per cable. Without a SAS expander, this unfortunately means I’d need 9 cables, and as such, would require 5 of the Dell H310 cards I’m using now.
The wonderful thing about the SAS expander is that all of these connections are combined into one cable, meaning I don’t have to worry about getting a bunch of cards, and a bunch of cables, and can connect all the drives at once. This sounds great, but it gets dicey here. You see, the SFF-8087 cables, and the data stream themselves, only carry 24Gb/s. This isn’t just “4 lanes of 6Gb/s,” which unfortunately means that for a single cable, I’m still constrained to the 24Gb/s.
Now, to be clear, this card is PCIe 2.0, so there is a bottleneck at the card level, because PCIe 2.0 x8 is constrained to 32Gb/s, but because the cable is a tighter constraint, I’m not too concerned with the PCIe limitations. My next thought was that I could run both backplanes on one card, as opposed to cascading them. This helps a bit, and means that the most we’d be pushing off of a single SFF-8087 connection would be 24 drives on the front backplane.
I’ve had some back and forth discussion on the /r/homelab Discord server, and between the advice I was given there, and the limitations I’d be working with, I did some more digging. I came across an Unraid forum thread from 2017 that was about some guy using a different chassis that used the same two backplanes. Unraid’s response was that you can run two SFF-8087 cables to the front backplane, and run it with dual link. The odd thing is that officially, Supermicro says dual link is supported on EL2 backplanes, but not EL1. This did give me hope, and made the decision for me that this server is gonna include two RAID cards in IT mode, so that I can run all 3 connections. This cuts my bandwidth to 12 drives per cable, and means that instead of the measly ~80MB/s when loading all drives at once, we’ll be getting closer to 200MB/s.
Granted, the limitation of the 32Gb/s of PCIe 2.0 still comes in play, meaning I can’t get 2Gb/s on 24 drives on the same backplane at once. That works out to ~166MB/s, but that’s still way better than cascading the backplanes.
The building
The building of all this was a bit different than most computer builds. Of course there was the standard parts you always need, but there were two stipulations here. Firstly, I knew I supposedly needed 2 RAID cards for this, to dual link the front backplane. Keep in mind that Supermicro doesn’t officially say this is even possible on the EL1 backplanes, so I’m not 100% sure if this is going to work.
Second, I don’t have a spare power supply that can give me power via 2 8-pin CPU headers, so I can’t actually test these parts outside of the chassis. In theory this is fine. It’ll just make my life a bit more complicated if something is DOA.
Spoiler alert: This is where it all went south.
You’re familiar with Murphy’s Law, right? Anything that can go wrong will go wrong? Have you guys heard of Cole’s Law? It’s thinly sliced cabbage.
Jokes aside, I had a plan, and it was all orchestrated so perfectly. And then it all went to hell. So I got my motherboard, the X10DRH-iT, and that thing was a freaking beast. I got my RAM, and I got my processors, and got about to testing it all out. Now, I didn’t have a spare power supply with two 8-pin CPU connectors, so I couldn’t test this with both. Testing with one processor was a no go when I jumped the pins on the motherboard for the power switch. Okay, maybe the processor’s dead?
Tried switching it with the other, and no dice. Zero reaction at all from the board, other than it drawing ~100W according to my UPS. No lights, no beeps, no POST. Supermicro’s manual says if you can’t POST, try removing RAM, and check. No dice. If you don’t get an error about no RAM in the system, try removing the CPU. No dice.
At this point, there’s two possible options here. Either the board’s funky, or somehow both my processors are dead. So, I messaged the eBay seller, and they offered to either refund, or exchange for a new board. I chose the refund option, and ended up going with a different seller. Turns out, the listing they had for the X10DRH-iT was mislabeled, and they had miscounted their inventory. They did not have the DRH, but for an extra $20, they offered to upgrade me to the X10DRI. I was shown the listing, and this listing came with dual E5-2620 processors, and the 1U Supermicro heatsinks.
The new plan
This new seller hooked me up with the board, and I was busy revising my plan a bit here. The board had changed from an X10DRH-iT to a DRI. No 10gig here, but that’s no big deal, as the extra cost of buying SFP+ RJ-45 modules for the other end of the DRH would probably have been more costly than a cheap DAC cable, and a 10gig SFP+ NIC anyway. And I was getting a slightly better board to boot.
Next up, the processors that were included were 2620v3 processors. I did some looking, and these were not the L class ones that I was originally planning on, but they were the non-L counterpart, and probably wouldn’t draw much more power idle anyway. So the new motherboard arrives, and this time it actually tests OK, and POSTs! Granted, this was with the supplied processors, so we know the board works. Just for kicks, I tried swapping the 2630Lv3 processors in, and no dice. Same issue as before, so somehow, it wasn’t the board, but both processors that I had ordered.
Since these processors were dead, I took a better look into the 2620v3 processors that were supplied. They aren’t the lower power ones I was looking at, but they perform a lot better speed-wise, and probably don’t idle at much more power than the L versions anyway, so I elected to stick with these. In the mean time, I ordered the chassis, and some 2U heatsinks to replace the 1U ones they sent it with.
The building (again)
Fast forward a couple of weeks, and I now have all of the parts. Now that I know I have working parts, it’s time to get this thing put together. The first order of business was getting this thing downstairs, and in position, and man, that was not easy. Even out of the box, the chassis is more than 80 pounds with nothing else in it. Come to find out, it’s heavy enough, and with 36 drive bays, that Supermicro designed it to lock inside of the rack. In order to fully open it, you have to pull it past the locked out position. Talking to Supermicro confirms that they did that as a safety thing due to the potential weight of a loaded server.
Speaking of Supermicro, I was missing some screws, since I bought this thing second hand, and needed to know what some of the screws were to lock the server in the rack. See, this chassis doesn’t click into place like the Dell or HP servers most homelabbers are used to. It’s held in by screws, and without them, it just slides freely on the rails. I contacted Supermicro originally because I didn’t feel like $20 on eBay was a reasonable price to pay for the bag of screws the rails come with when you buy from Supermicro. While they couldn’t sell a bag of screws, they were extremely helpful to the point of providing dimensions and CAD drawings of the screws I needed. Turns out way more of these screws than I needed only cost me about $10 from McMaster.
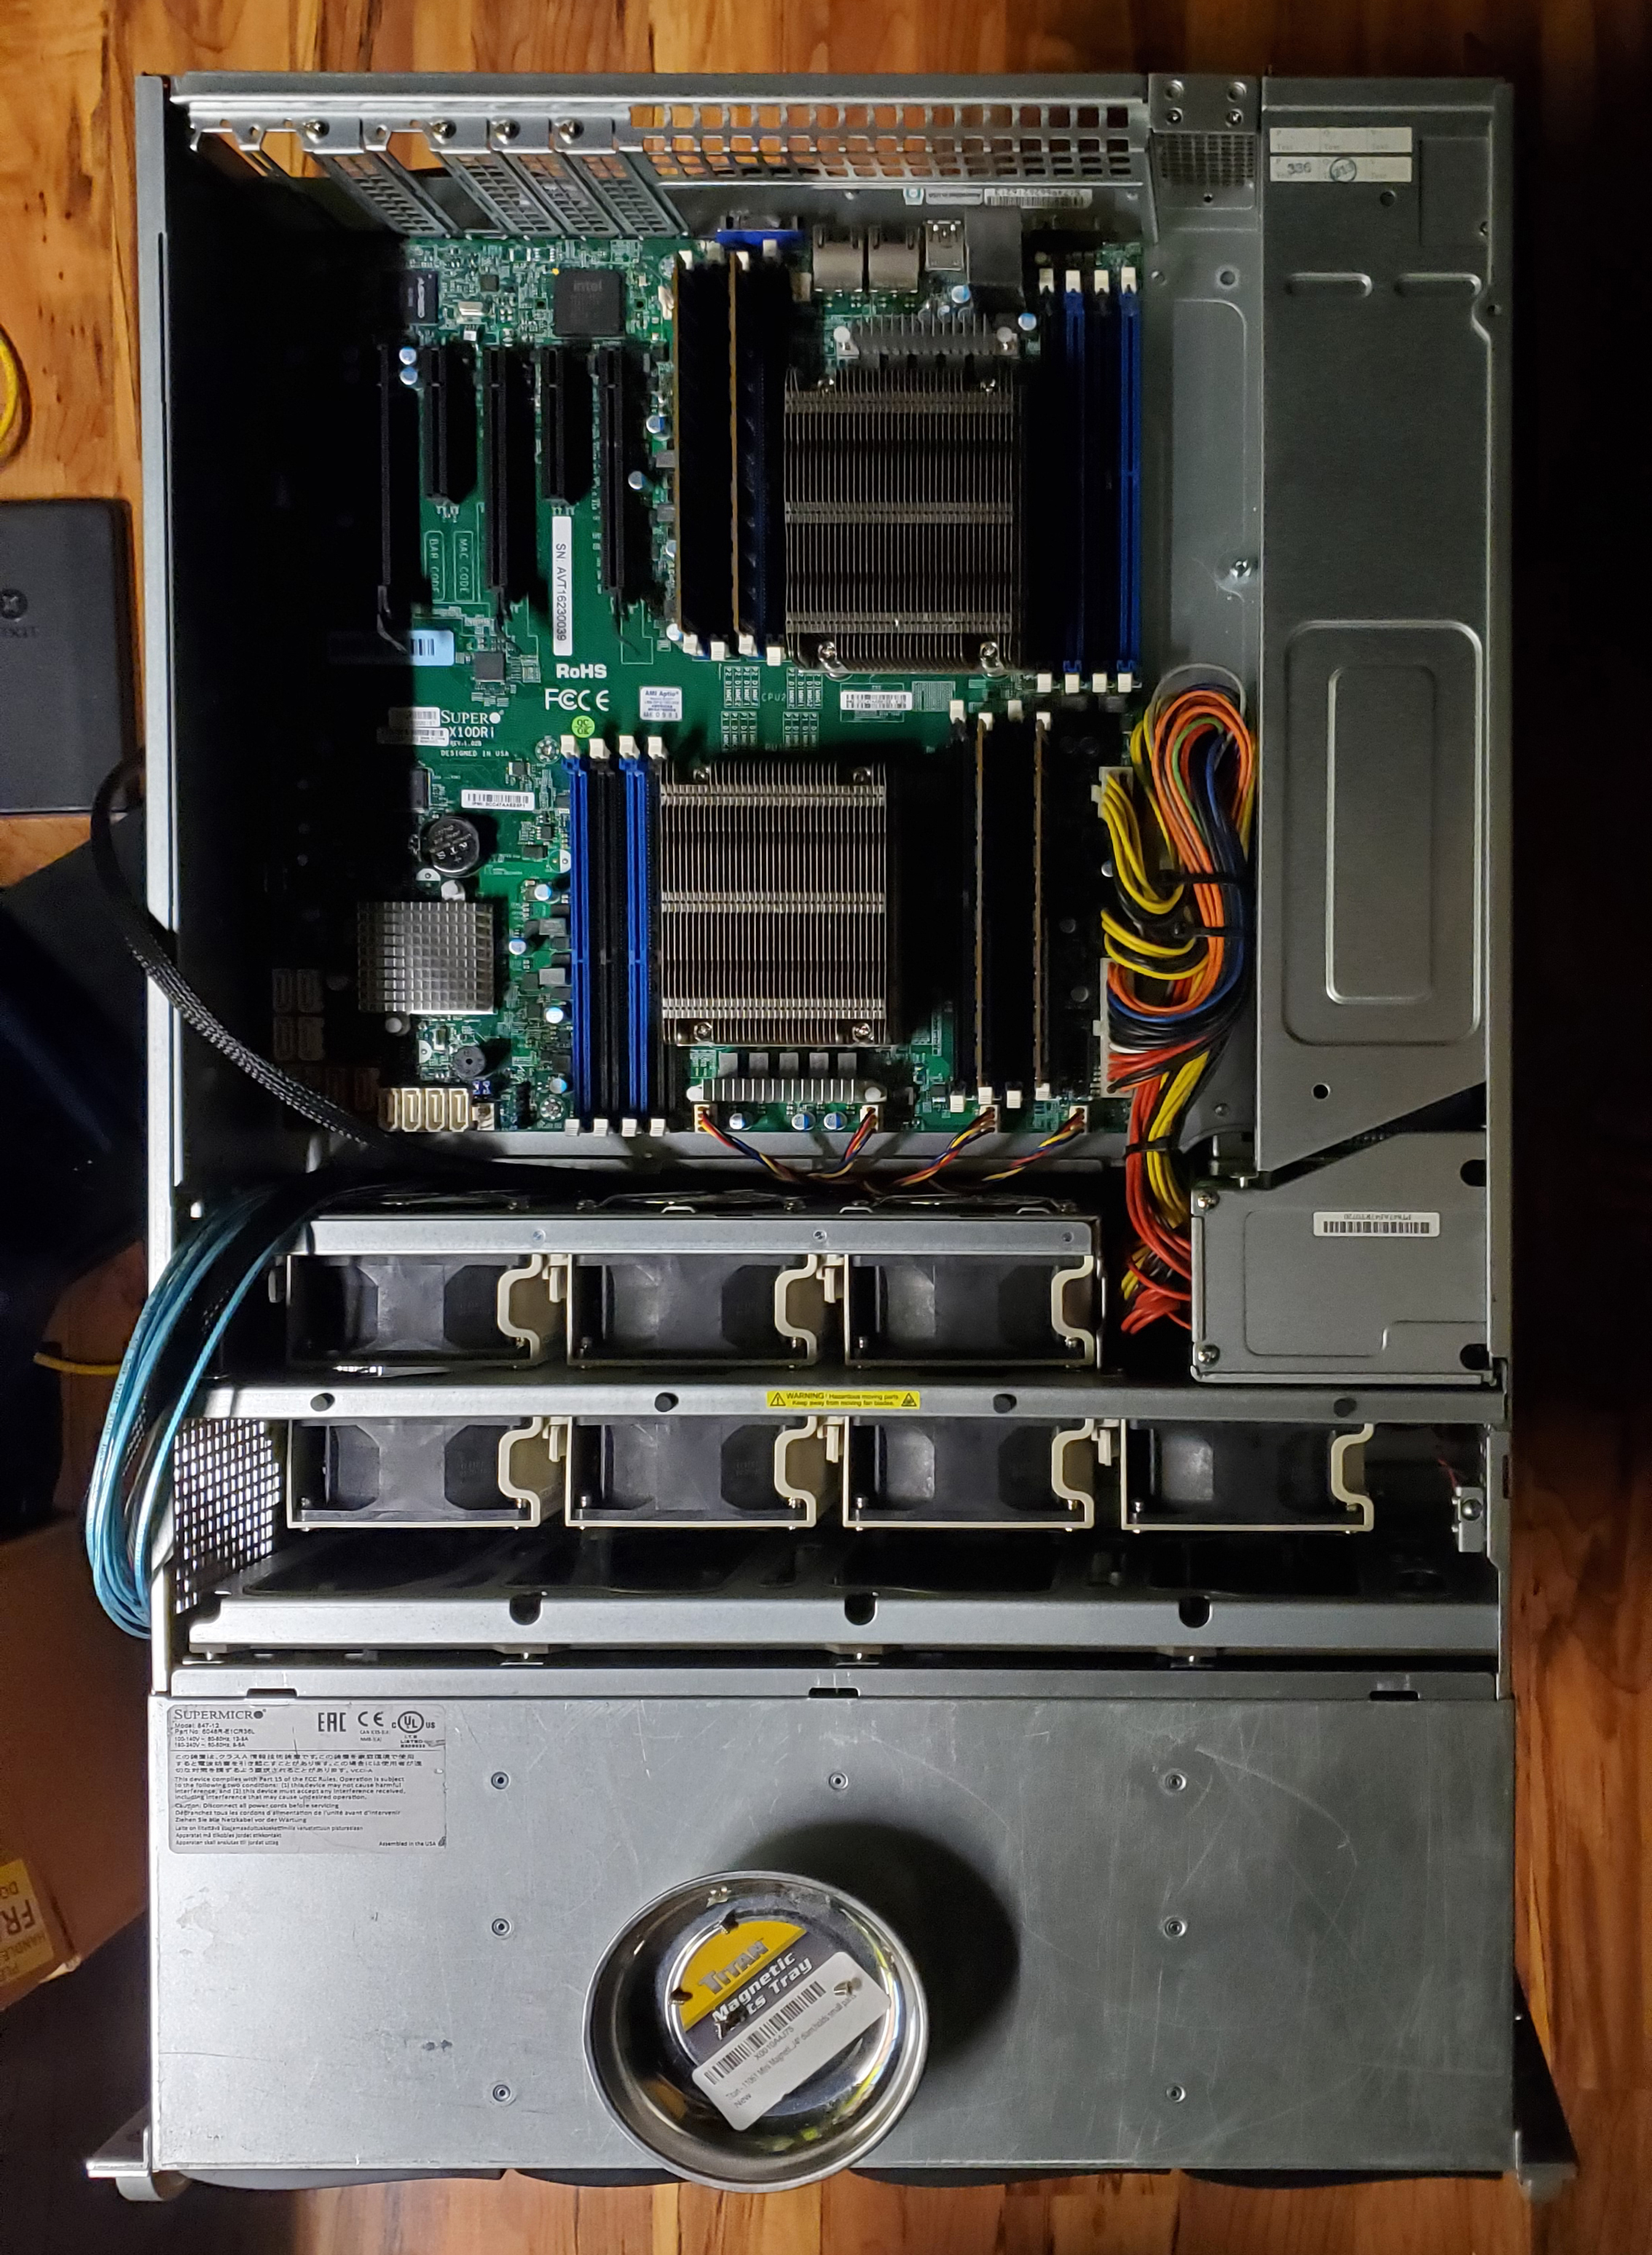 Motherboard installed like a charm. Only thing left is to figure out how to hook up HBAs and fans.
Putting the motherboard was significantly easier than I thought it would be, since the chassis uses permanent standoffs in the motherboard tray. No installation or moving of any required. Just drop in the motherboard, and secure with the same 3.5" hard drive screws that they use for everything on that chassis (big thanks to Supermicro for making keeping screws straight so easy!). The HBAs and fans were a tad trickier. Turns out routing fan headers to this board is tricky when you have 7 of them to hook up, but it was doable with some finnagling of cables. The HBAs installed like a charm, but routing them was interesting. The rear backplane requires me to slide the motherboard tray almost completely outside of the back of the chassis, which was a bit tricky due to it not unlocking as easily as a new one would.
So remember what I said before about anything that can go wrong will go wrong? Yeah, that happened… The rear backplane in this chassis isn’t working properly. So, naturally, I poked around a bit, and discovered it’s not even spinning up drives, let alone letting me see them. Best I can figure is that the backplane is probably dead, and needs replacing. I still have 24 bays in the front, so this isn’t a huge deal, but that’s a project for another day.
The result
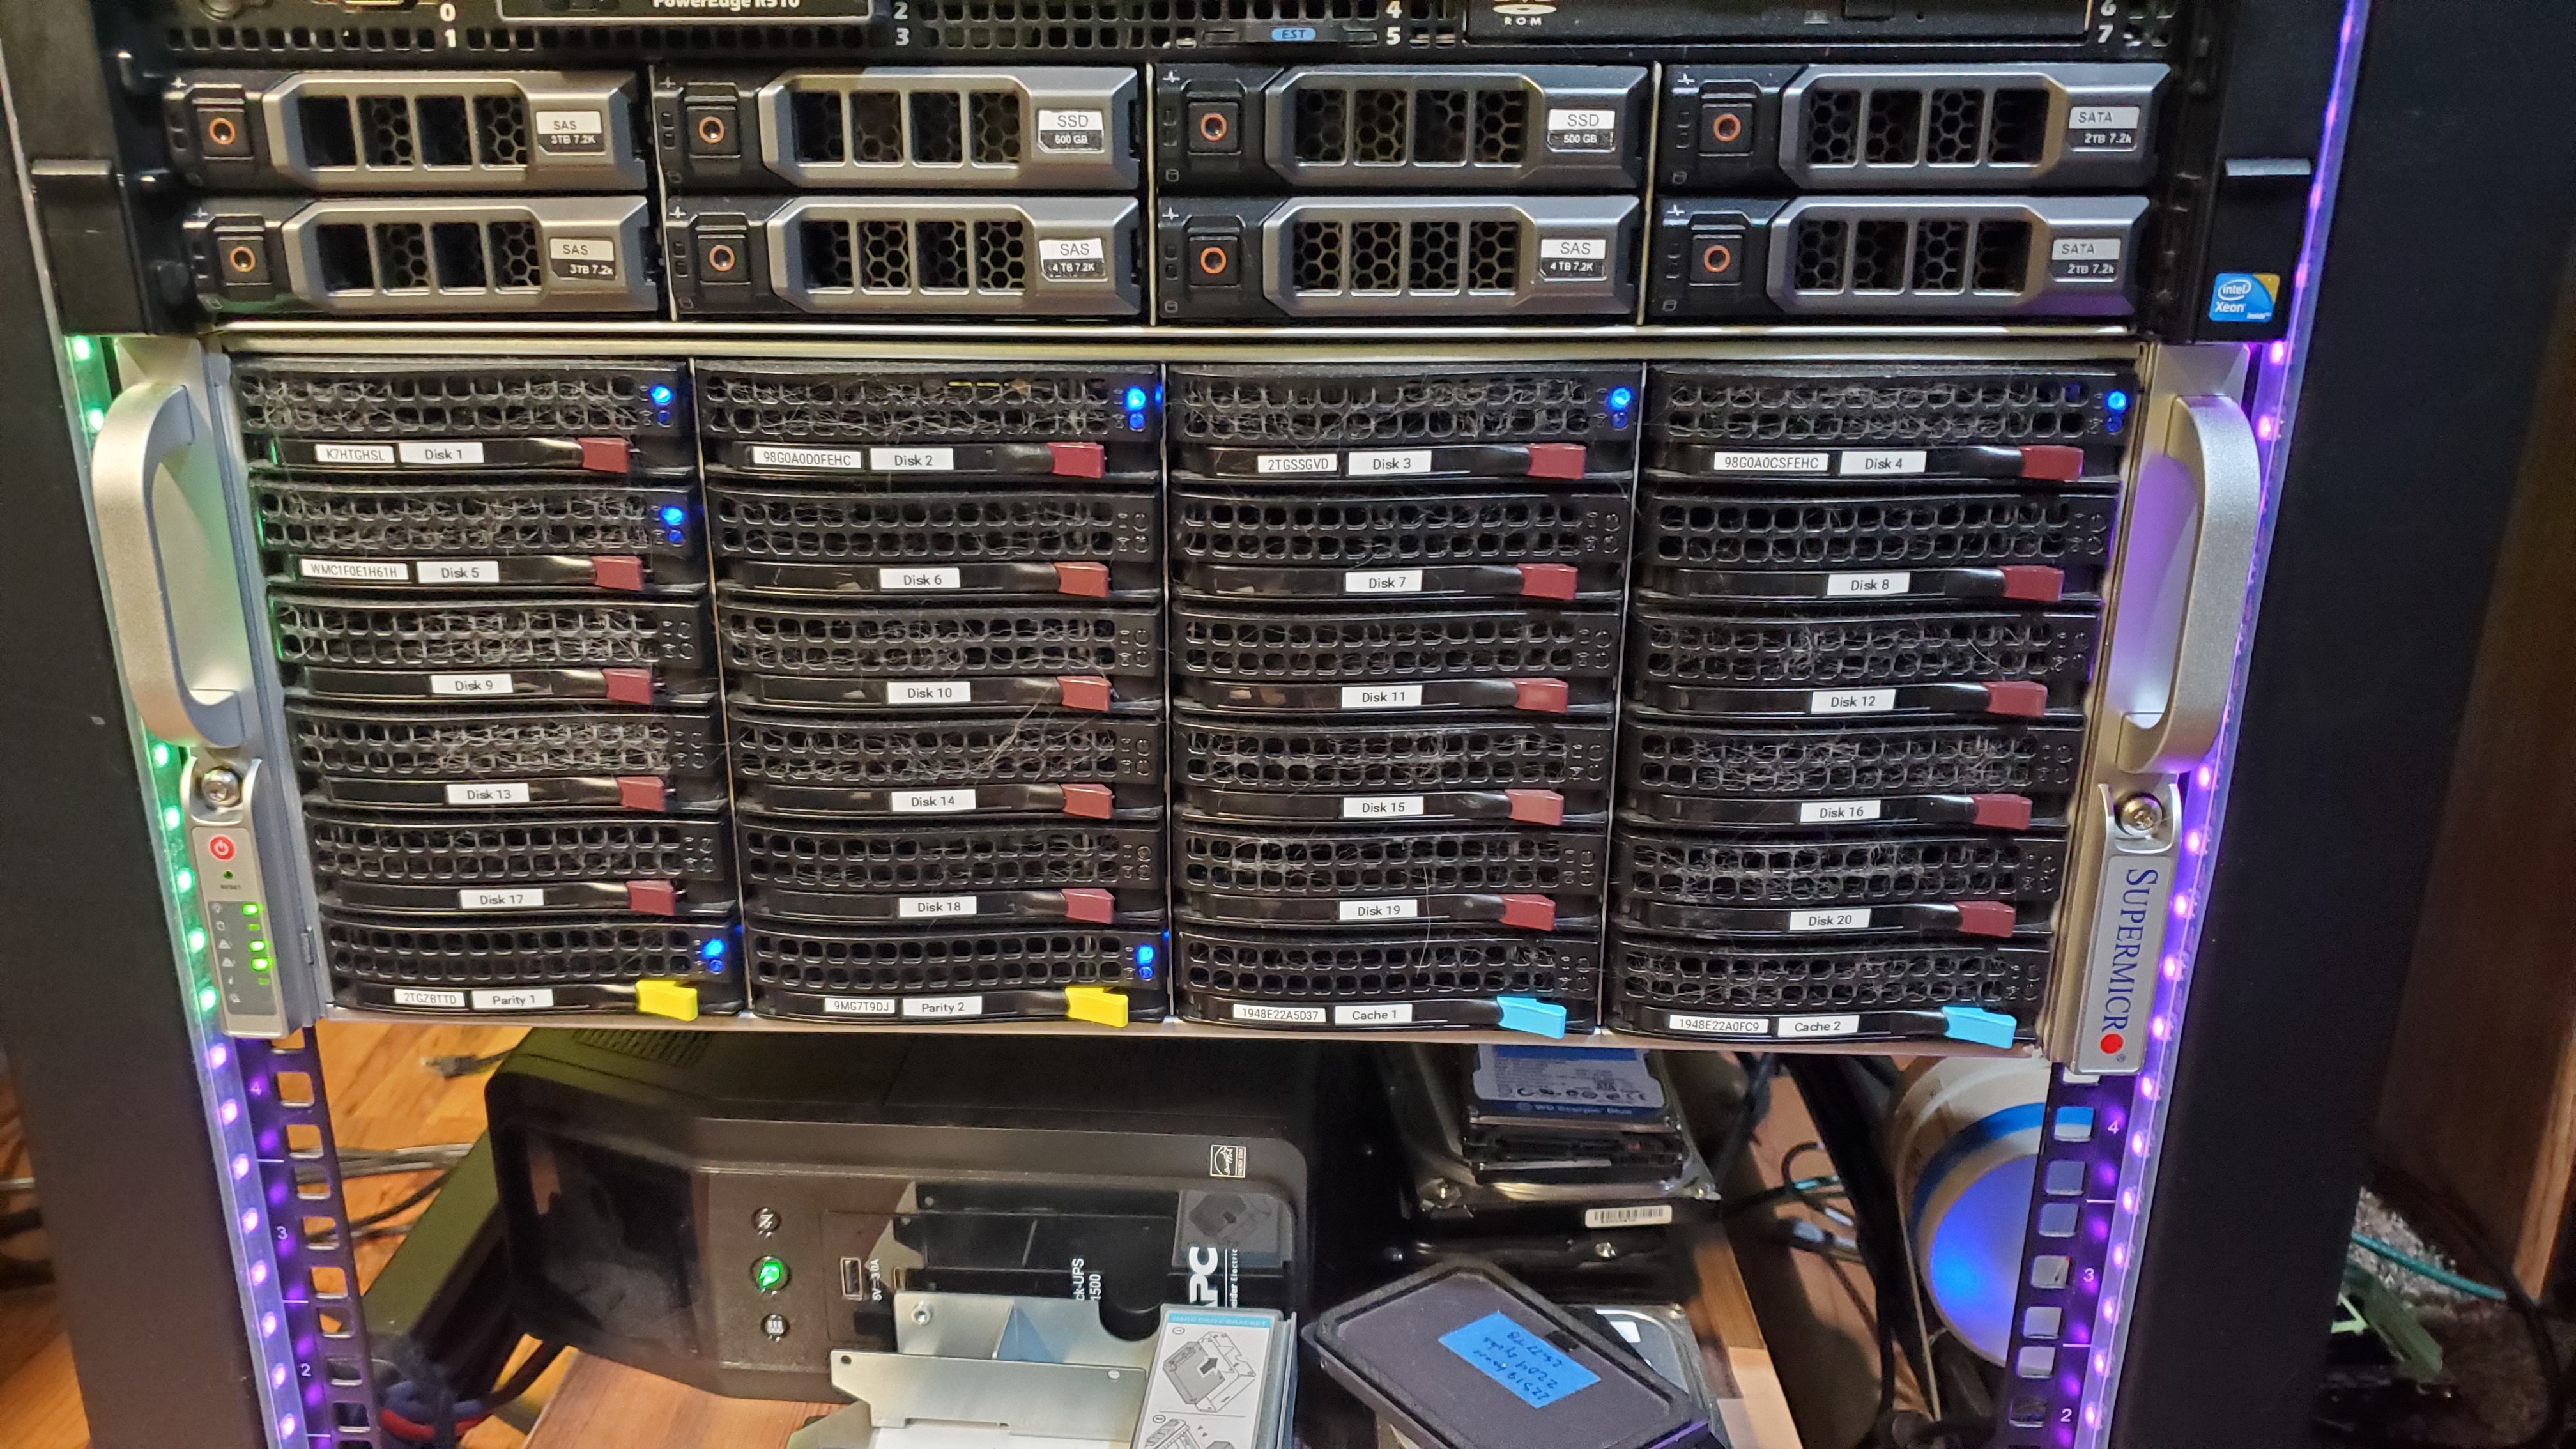 Now that everything is installed, it looks pretty awesome in its new home!
Most of those caddies with the red tabs are stock Supermicro. The other colored ones at the bottom were from a post on Reddit about custom 3D printed tabs. I saw the idea, and thought it would be useful for color coding things to separate data, parity, cache, etc.
So all in all, I had a few goals in mind when I set out to build this server. So how did we do? Well, the main reason for the upgrade was wanting more than 8 drive bays, since 6 array drives when one of them was parity was a bit limiting. Even though 24 are accessible now until I replace the bad rear backplane, the potential to hook up 36 drives solves that problem for sure!
Next, I wanted to make the jump to more modern hardware, as 11th gen Dell is showing its age now. Upgrading from dual E5620 processors to dual E5-2620v3 solved that problem, and got me some more horsepower, and we managed to jump from DDR3 to DDR4, which is great. The downside is that it’s the only DDR4 server I have, so it’s still 64GB, since I couldn’t combine it with other RAM I already had.
So how does it perform? Well, I never measured, but it seems boot time on it has been easily cut in about half, if not more. It’s rare I have to reboot anything in the rack, but a boot time of 10-12 minutes on the Dell when I did have to was getting kind of old.
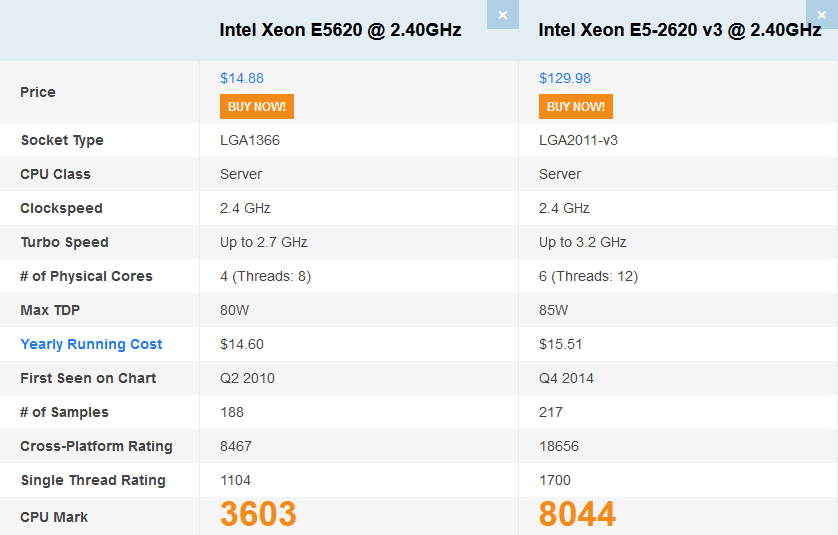
The revised processor, while not as powerful as it could be, is a considerable step up from the E5620s that were in the R510 before. 4 extra cores, and more than double the processing power of the old system means I’ll have plenty of headroom for anything I want to throw at it. The future plan is to throw a bit more than 64GB of RAM in it, in case I want to run some VMs, and potentially upgrade from 2620v3 to 2630v4, though they aren’t exactly the cheapest things in the world.
As for the old R510, it’s currently mostly off, though I spin it up to quick test some things here and there. It’s currently running a test build of Unraid 2.9, though it seems it might not be too long before the stable version releases. In the mean time, on this new server, I clearly have some work to do, but that’s a post for another time.