
Wrangling DNS on Your Network, Part 4: Pi-hole vs. pfBlockerNG
This comparison is part of the “Wrangling DNS on Your Network” series because in previous parts, we’ve worked with both Pi-hole and pfBlockerNG, and a lot of people suggested I do a comparison.
This comparison is a side by side between the two, and as such, it’s mainly DNS-focused. This is not meant to recommend pfBlockerNG only for DNS, or to ignore its other features. The comparison is DNS-focused because that’s the only thing that can directly be compared to Pi-hole.
A short while back, I installed pfBlockerNG to replace Pi-hole in an attempt to eliminate the second hop of splitting adblock and local hostname resolution, and get DNS on one device, and to try it out. Many of you wanted to see a comparison between the two, so I thought I’d explain some of the differences.
It should be noted that at the time of writing, the main package is v2.1.4_22, and the devel package is v2.2.5_33.
This comparison is against Pi-hole v5.0, and pfBlockerNG-devel v2.2.5_33.
BBCan177 has said that the plan is for devel to become the main version sometime hopefully soon. If that goes according to plan, the UI in the main version probably will look the same, and adopt the new organization scheme.
First thing’s first
Before we get started here, I want to address the elephant in the room. Yes, I know pfBlockerNG does way more stuff than Pi-hole, and I know they’re not directly comparable. However, you can use pfBlockerNG to replace Pi-hole if you don’t wanna touch a bunch of other features.
Fair warning, if you want to make the switch, and you’re used to Pi-hole, pfBlockerNG takes a bit longer to set up, and it’s not as simple. There’s a bit of manual effort required to set pfBlockerNG up, there are a lot of things that it reports that you might not need, and it’s not a plug and play solution. It will require some fiddling, it will require more manual work, and it might confuse you a little bit when you’re setting things up.
That being said, pfBlockerNG is an awesome tool, and if you want to make the jump, it’s totally worth it, because there’s so much more than just DNS blocking that it can do.
The glaringly obvious issue that I ran into, is that because the block lists range from slightly more aggressive than Pi-hole, all the way to really thorough ones, some stuff you use, somewhere, is probably going to be blocked. This is a good security bonus, because it keeps more of the nasty stuff out, but it means that depending on the lists you choose, you may have to do some fiddling. This isn’t the fault of pfBlockerNG, but rather the aggressiveness of the block lists being used.
You might find a website that you can’t get to, and find that it’s an easy fix. Or you might spend days wondering why a game doesn’t work right. This might be a smooth ride for you, or you might have to spend time digging into what things are trying to get to and why, in order to determine what you need to unblock. You might scratch your head. You might swear a lot at things that aren’t working. You might cry.
Such is life with hardening security with any firewall, figuring out what you can and can’t get away with. pfBlockerNG is no exception to this, especially if you’re using some more aggressive block lists than I am.
Your mileage may vary here, but over the course of the last few days, I had to whitelist the following:
- analytics.google.com
The setup
Pi-hole’s setup is dead simple. It walks you through absolutely everything, and will automatically download the blacklists and enable them. Pick an IP, a hostname, and a DNS provider, and answer a few simple questions, and you’re done in less than 5 minutes. If you don’t want to tweak anything else, you’re good to go, and it just works right then and there, no other work necessary.
pfBlockerNG, on the other hand, takes about the same time to run through the wizard, and also self-updates when you’re done. Once you’re done, however, there’s a bit of manual work that needs to be done, and you need to pick and enable some extra block lists, and manually update to get them to take effect. All in all, it takes less than 10 minutes, but it’s a bit more involved.
Simple reports
For simple reports of stuff that’s happened, like top blocked domains, clients, and other sorts of stats, both services lay everything out in a sort of similar way.
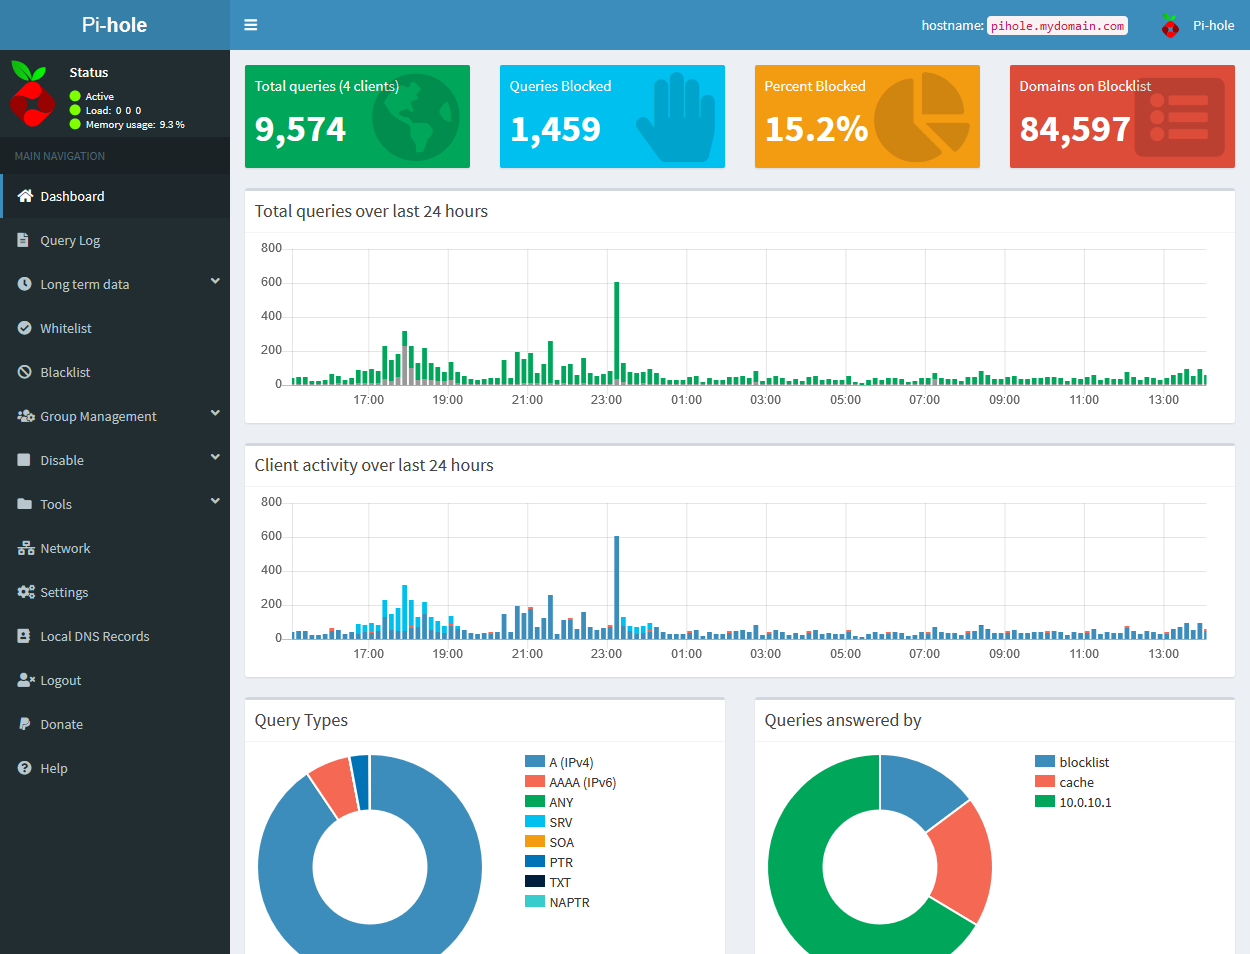
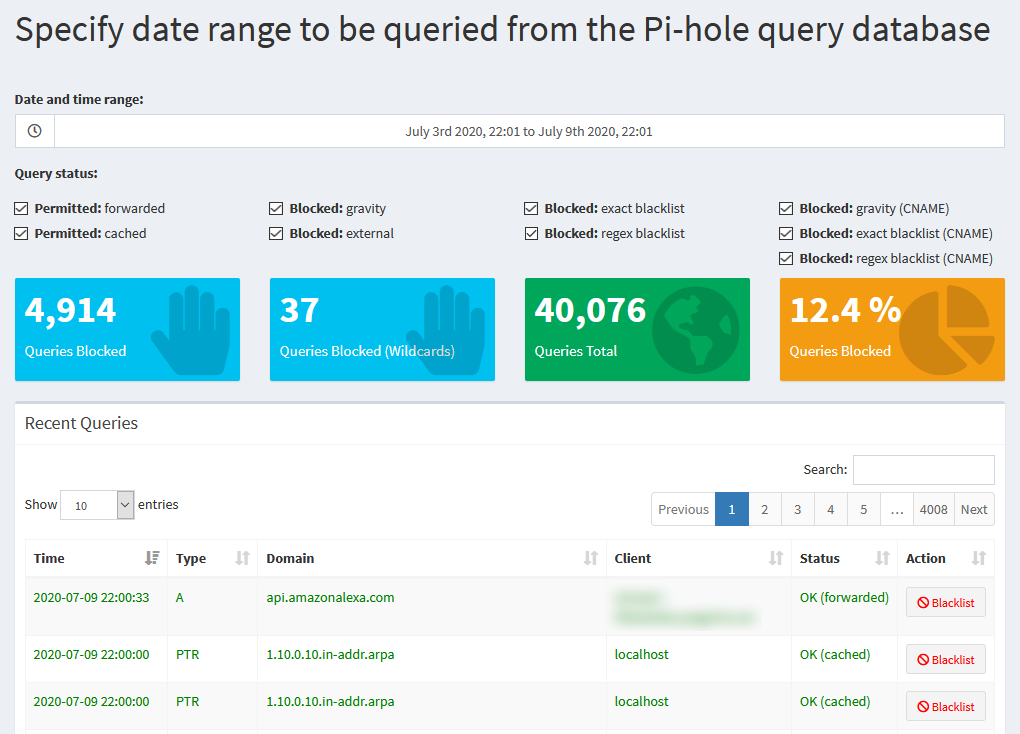
On Pi-hole, stats for queries over 24 hours, as well as query type, clients, and the like, are right on the main page. Heading over to pi.hole, or in my case, pihole.mydomain.com, redirects you to the /admin page, and after logging in, here, you’ll find those stats.
Pi-hole is also nice enough to show overall stats up top, like total queries, total and percentage blocked, and items on the blocklist.
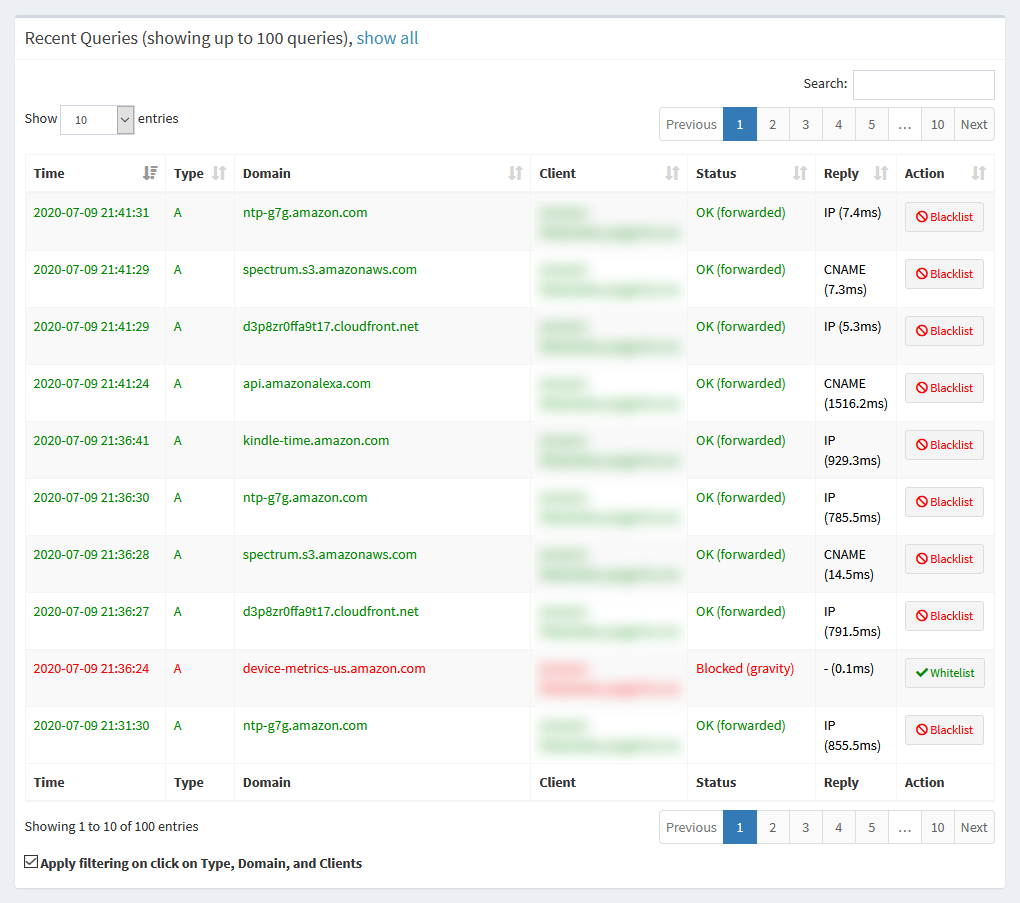
If you want to see a log of recent queries, you can find that under Query Log in the sidebar. This shows up to 100 recent DNS queries.
pfBlockerNG, being a pfSense package, lives inside the pfSense GUI, at Firewall > pfBlockerNG. I will be referring to places to navigate in pfBlockerNG relative to that page.
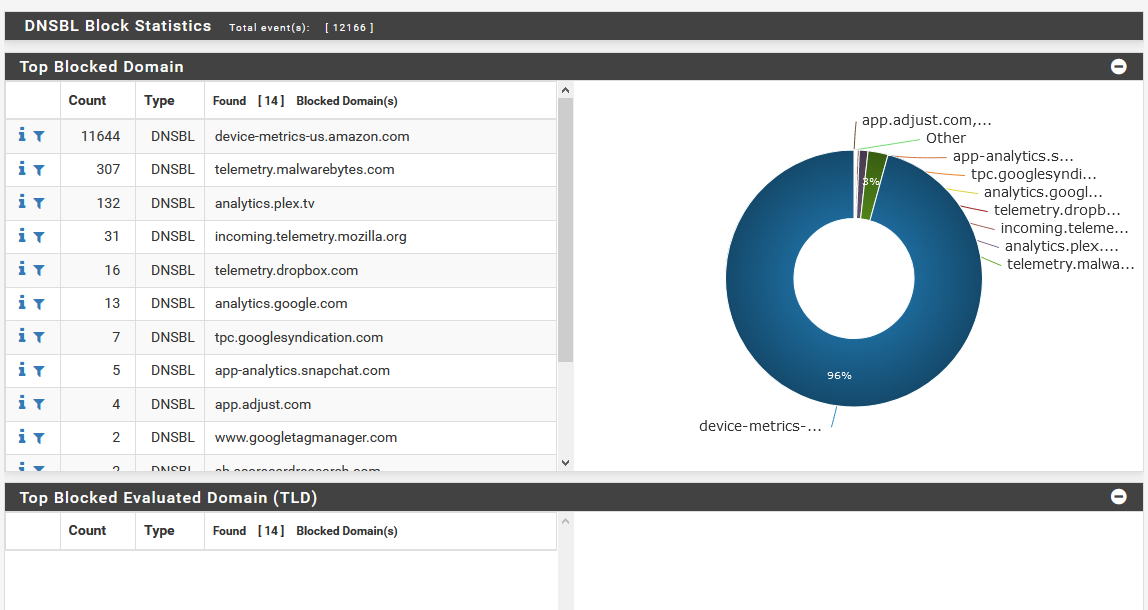
pfBlockerNG is a bit more buried, since the main pfBlockerNG admin page is for configuring settings. To view reports, you’ll find the stats all under the Reports tab. For the DNSBL stats, like we’re using to replace Pi-hole, you’ll need to further go into the DNSBL Stats sub-tab. This may seem a bit clunkier, but this is just the nature of how this has to be configured, since pfBlockerNG does other stuff besides just DNS block lists.
In the DNSBL stats page, you’ll find graphs that look similar to Pi-hole’s, but for a whole lot more stuff. Like Pi-hole, pfBlockerNG lets you see top blocked domains and top clients (referred to as Top Source IP), but you also get stats like top activity broken down by hour, top blocked page types, user agents, and more.
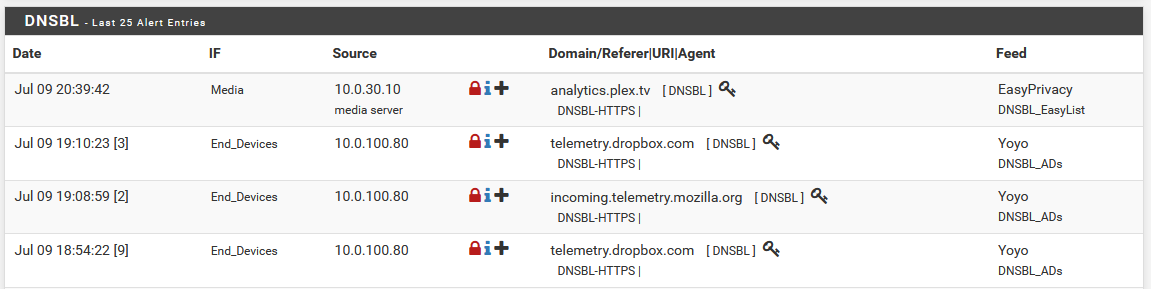
To look at the recent queries, just like you’d find in Pi-hole, you can go to Reports > Alerts, where you’ll be presented with a list of things that are happening. For DNS blocking, the DNSBL section will show you the list of blocked domain queries.
Since pfBlockerNG also does more than just DNS blocking, you can also check out the IP Block Stats, IP Permit Stats, and IP Match Stats sub-tabs under Reports to see graphs for things like GeoIP blocking or similar.
Admittedly, there’s a lot of info to take in here, but it shows some interesting stuff.
Whitelisting domains
Occasionally, when you’re working with a firewall, or DNS blocking solution, there’s inevitably a time when something you need to get to is going to get blocked.
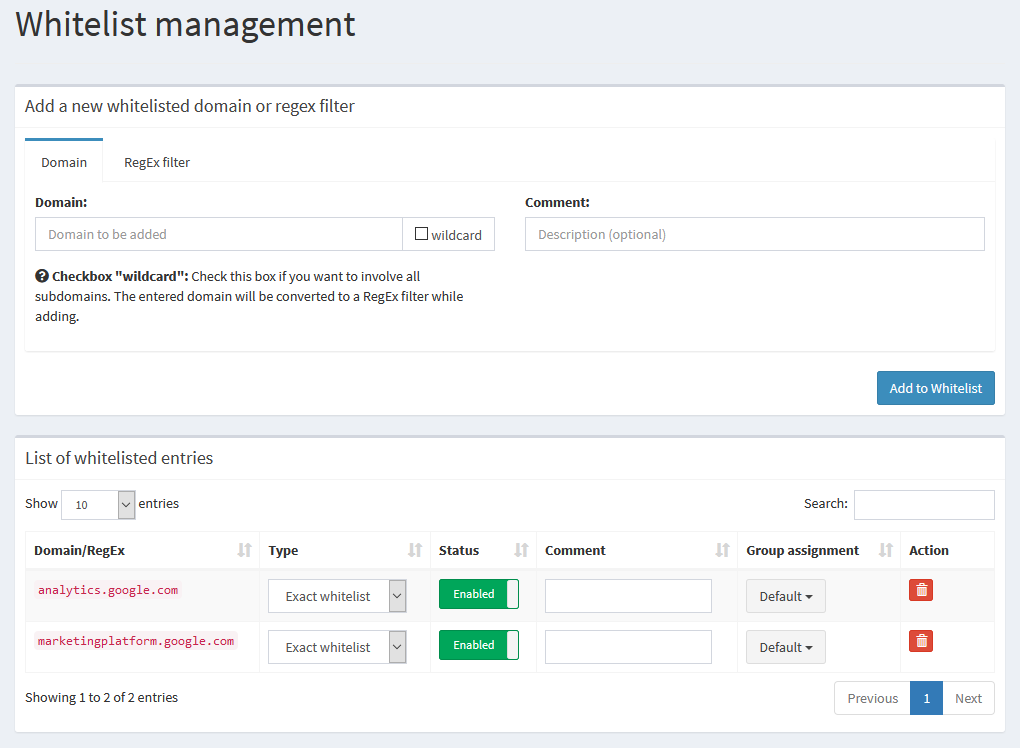
In Pi-hole, to view the whitelist, you can click on the Whitelist option in the sidebar. This takes you to a page where you can view the custom whitelist, change settings like group assignment, and toggle or delete entries. From here, you can also manually add entries to the whitelist by entering the domain, and an optional comment about the entry. Under “type”, you can change each domain in the list to be either exact, or a wildcard entry.
You can also find a very similar looking list under Group Management > Domains where you can have the option under “type” to swap a domain between whitelist and blacklist.
The process here seems a bit redundant, to have both whitelist/blacklist, and a global page to show both, and having the option on either page to add the same data to the same list, but that’s how Pi-hole has laid things out.

If you want to automatically add something to the whitelist, you can head over to Query Log, and each entry will have either a Whitelist or Blacklist button next to it that you can click. If you need to search, you can filter via the search box, as well.
The one thing you do have here is an option to regex match, which unfortunately, is not a thing that can be done in pfBlockerNG.
 You can manually edit the whitelist to add entries
 From the reports list, you can automatically add an entry to the whitelist, by clicking a button next to a domain
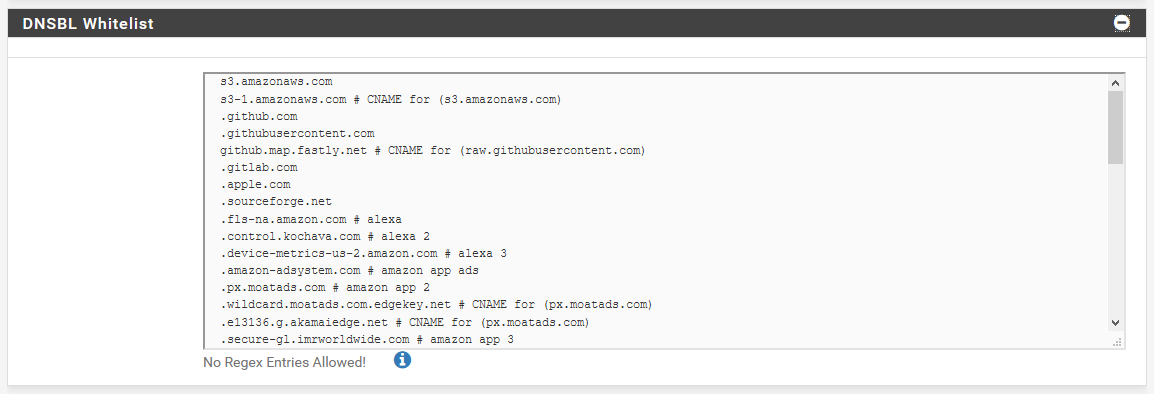
pfBlockerNG also has two options. If you’d like to add a whitelist entry manually, you can go to the DNSBL tab, and click the + next to the DNSBL Whitelist section to expand it. From there, you can add a new line to add your entry manually to the whitelist, and click Save at the bottom to save.
The other option, which is a bit friendlier, is to navigate to Reports > Alerts, and under the DNSBL section, this will show you the recently blocked domains, and the source IP that requested them. For each of these domains, you can click the + in the entry, and you’ll be asked if you want to whitelist only that domain, or if you want to add a wildcard entry, to whitelist the domain, and subdomains.
Blacklisting domains
For the most part, since you’re probably using either Pi-hole or pfBlockerNG as a DNS blacklist, you probably don’t need to specifically blacklist stuff manually. Should you, however, need to keep your kids off of a certain website, or manually add an ad domain that might be slipping through, you do have that option.

In Pi-hole, this interface probably looks really familiar to you. Just like the whitelist, we can navigate to Blacklist in the side navigation, and we’re presented with the same form to add entries, and we can select between normal and wildcard entries, or even do a regex match.
Again, just like the whitelist, we have the same list of what’s already there, and the same options for toggling, changing, or deleting entries. And like the whitelist, these can also be found in the list under Group Management > Domains.
Should you choose to do this automatically, you have the same option in the Query Log page, where you can search the list for a domain, and click the Blacklist button to add it to the list.
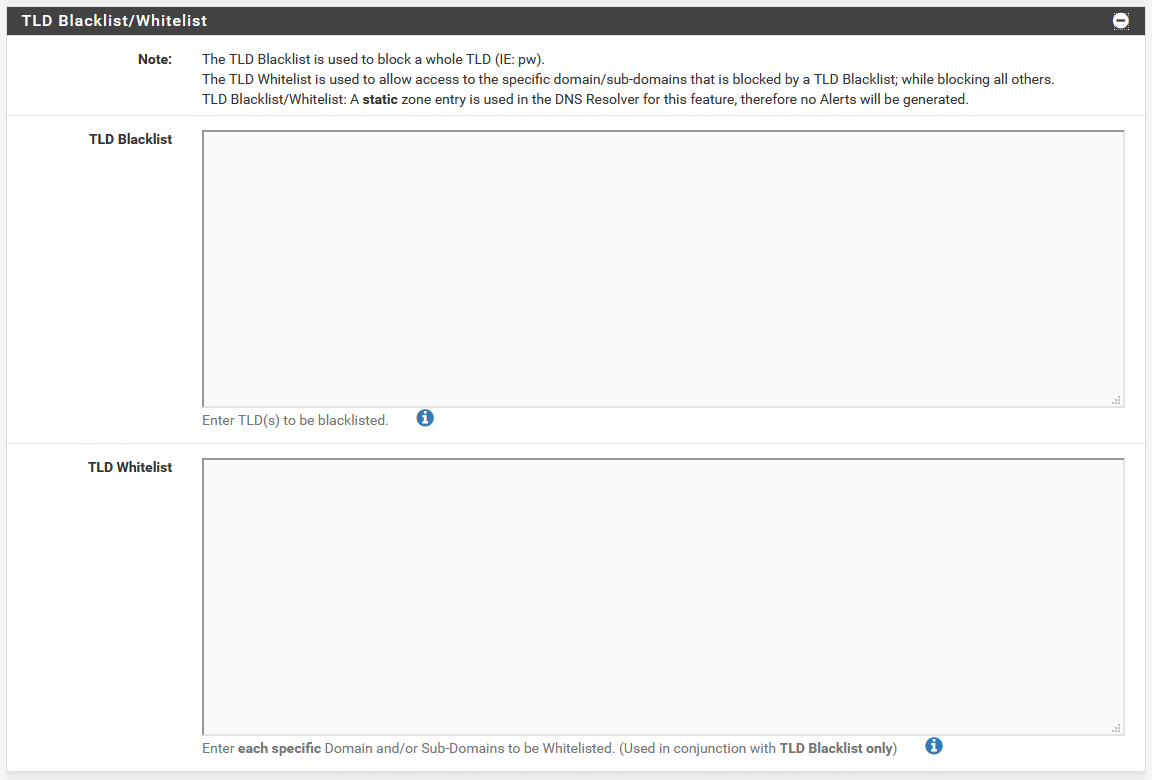 pfBlockerNG has a built-in TLD blacklist option
Blacklisting domains in pfBlockerNG is a bit trickier. Under the DNSBL tab, there is a section that can be expanded to edit a TLD whitelist or blacklist, but that’s not quite what we want.
TLD blocking is a very powerful feature. Most people think of this as a way to block, say all .ru domains. This is a thing you can do, but it’s much more powerful than that. See the explanation at the end of this post about what it can do.
To actually block specific things, we’ll need to dive a bit deeper.
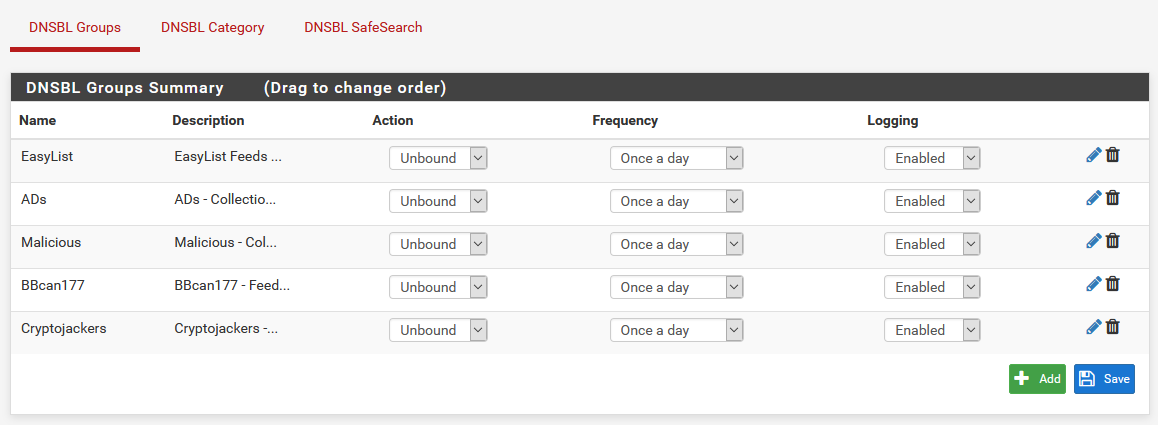 The DNSBL groups page has an option to add a new group
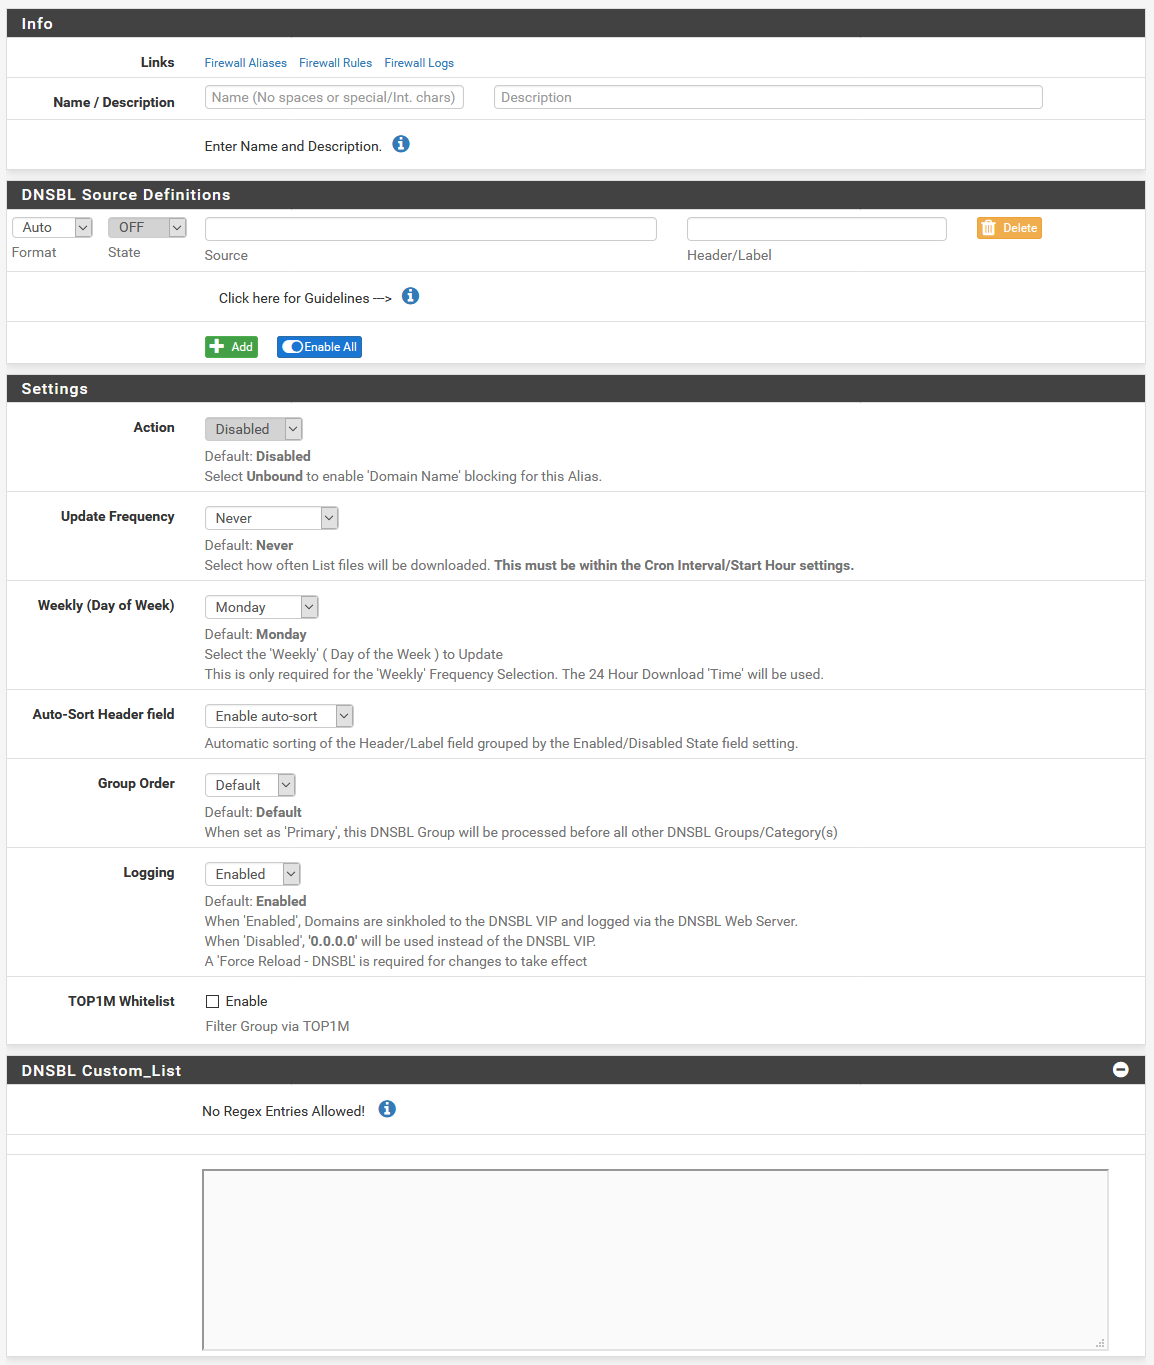 Here, you and add a list of stuff
If we head over to DNSBL > DNSBL Groups, we’re presented with a list of all of the DNSBL groups we have configured. At the bottom, notice how we have the option to Add a group.
If we do that, we get a page that looks really similar to the page to configure new feeds that we enable. Here, you can give your feed a name, and toggle the action to be Unbound, just like we did for all of the default feeds when we set up pfBlockerNG.
The trick here is that instead of adding a blocklist URL under the DNSBL Source Definitions section, we instead scroll down to the DNSBL Custom_List, there’s an option to enter a list of stuff to block. This is formatted just like you see in the DNSBL whitelist on the DNSBL tab. Each line is a new entry, and we can block domains or subdomains like analytics.google.com, or wildcard domains like .analytics.google.com (notice the leading . on wildcard matches).
Unfortunately, there’s no option to do regex matching like we have the option for in Pi-hole.
Once your list is complete, click on Save DNSBL Settings, and your changes will be saved.

If we head back to the DNSBL > DNSBL Groups sub-tab, we can see that we have a new entry in the list. To edit this list later, to add or remove domains, we can come back to this page, and click the pencil icon to the right of our entry.
Local DNS records
If you run a homelab like I do, you probably have a whole lot of stuff you want to keep track of, because remembering IPs is boring and hard when you’re looking for something in a browser. The solution here is to add local DNS records.
This used to not be an option in Pi-hole. If you want to use Pi-hole for local DNS records like this, you’ll need to make sure you’re on version 5.0. I’ve been using Pi-hole since well before v5.0, so I’ve taken to handling local DNS on pfSense.
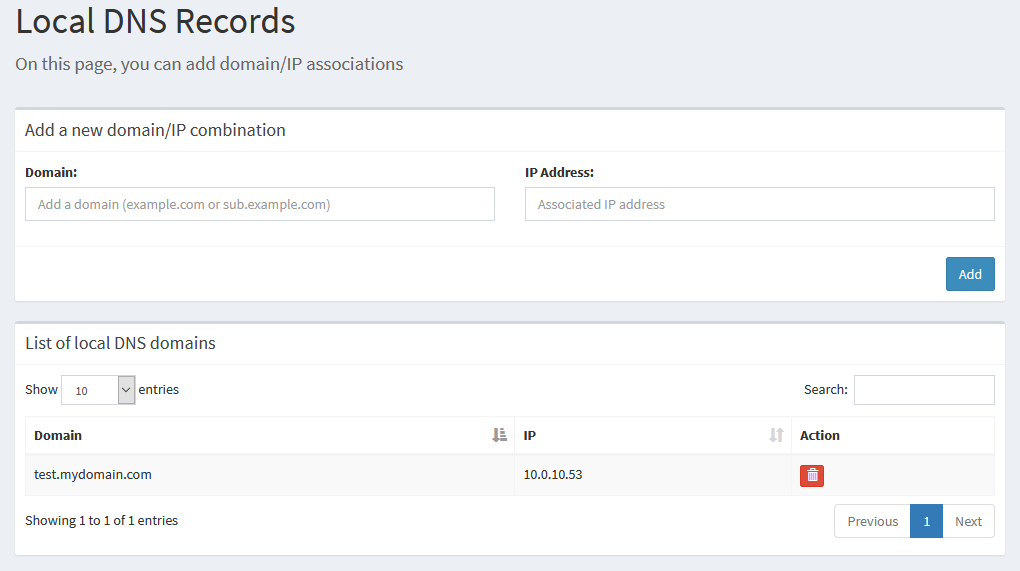
In the sidebar, if we head to Local DNS Records We are presented with a page that lets us add our own domains and subdomains, and specify the IPs they point to. We can also see the list of domains we’re already set up for.
The only action we can perform is to delete an entry, so if you need to edit an entry, you’ll have to delete and recreate it.
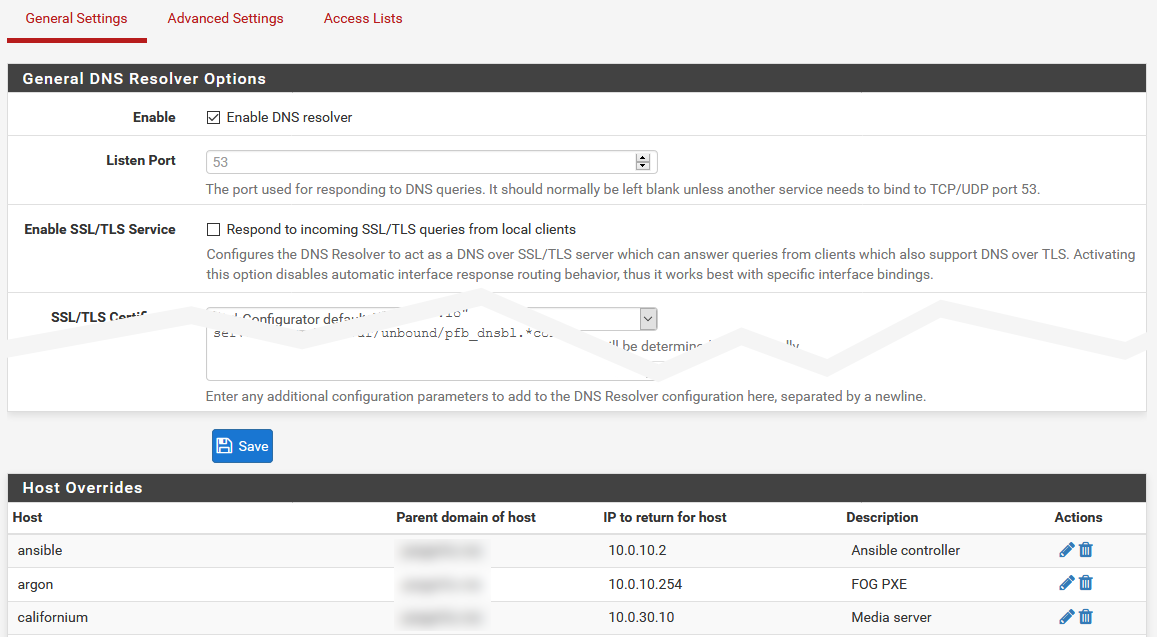
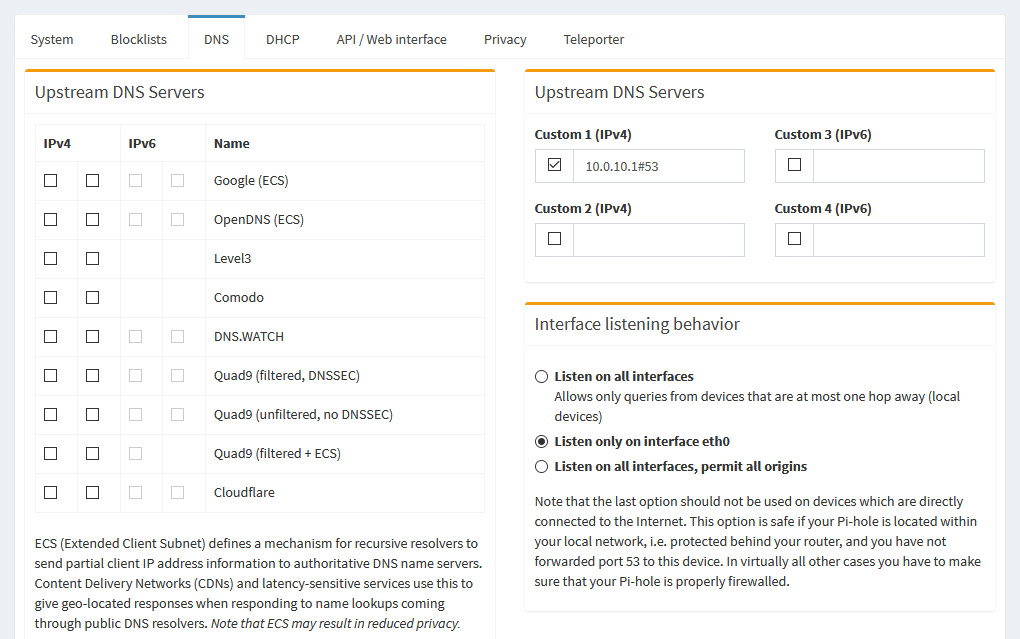
In pfBlockerNG, we technically don’t have the option for local DNS. However, pfSense itself does have a built in DNS resolver that we can use to add custom entries. Head on over to ** Services > DNS Resolver** in the top menu of pfSense, and you’ll see a screen that looks a bit like this. At the bottom of the Host Overrides section, you can click Add to add an entry to the list.
Once you’ve done that, in pfSense, you have to manually click the button in the yellow banner to reload your changes. This tends to be useful for making a lot of changes at once, in case updating live halfway through may potentially break DNS with something (if you’re editing a large batch of entries, for example). You also have the option in this list to edit or delete each entry.
The lovely thing about pfSense’s DNS resolver over Pi-hole is that there’s an option to create aliases, where you can assign several domains to the same IP, without having to update each one if the IP changes. This can be very useful in the case of things like a reverse proxy, where you might want a large batch of subdomains to run to one IP for processing with your own reverse proxy.
Querying data
If you need to query data, we’ve learned how to do that, but if you need to look back at data that’s a bit older, to get a larger picture, it’s a slightly different process.
In the sidebar, there’s a section labeled Long term data. Under this, you’ll find sections for Graphics, Query Log, and Top Lists.
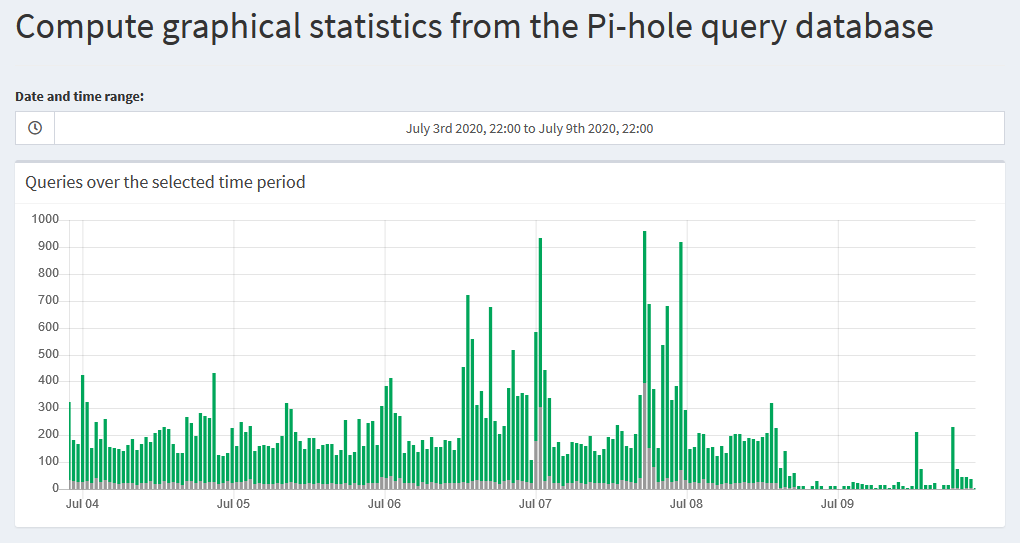
The Graphics section shows a bar graph of queries over a given time. This is just like the graph for 24 hours that we see on the main dashboard page, but for a custom time range.
The Query Log section shows the same list we saw in the default Query Log page, but again, for a selected time range.
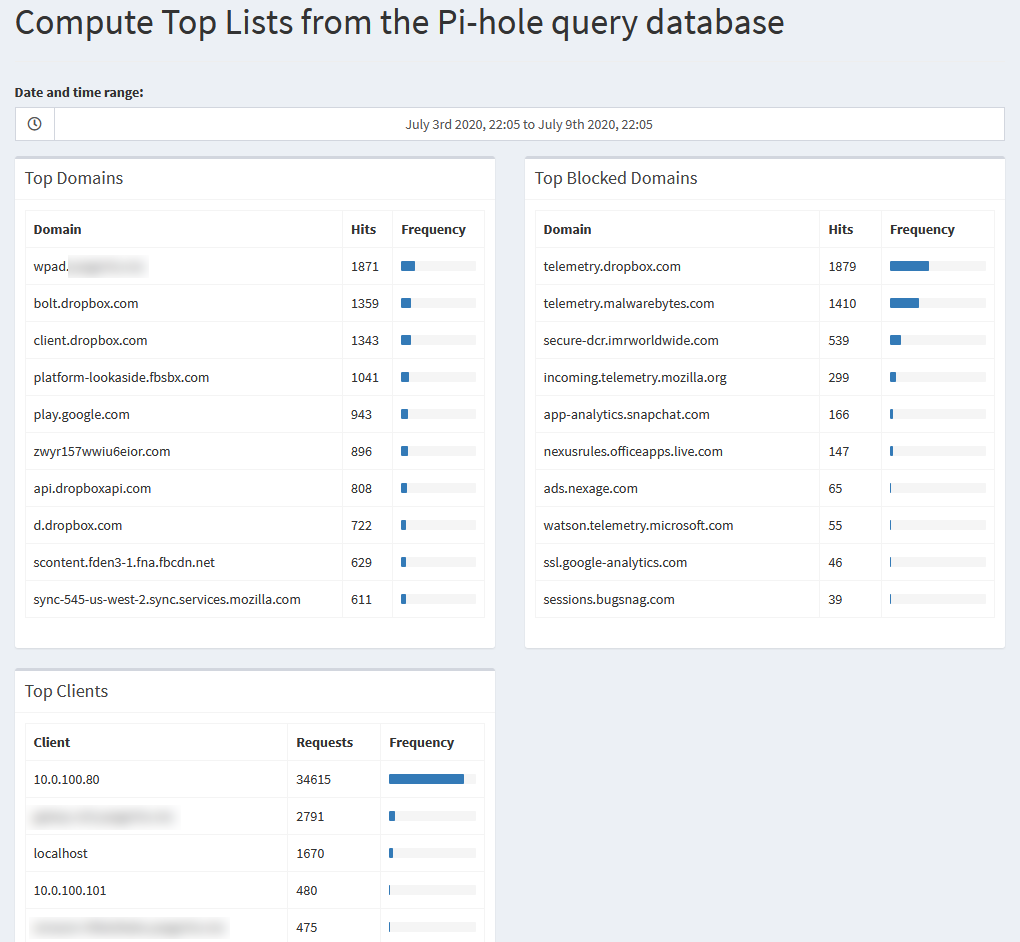
The Top Lists page shows the lists we can find on the main dashboard for top permitted or blocked domains, and top clients, once again, for a selected time range.
Editing block lists
If you want to block specific things in a whole group, the easy way to do this is to customize your block lists. Both Pi-hole and pfBlockerNG provide ways to do this.
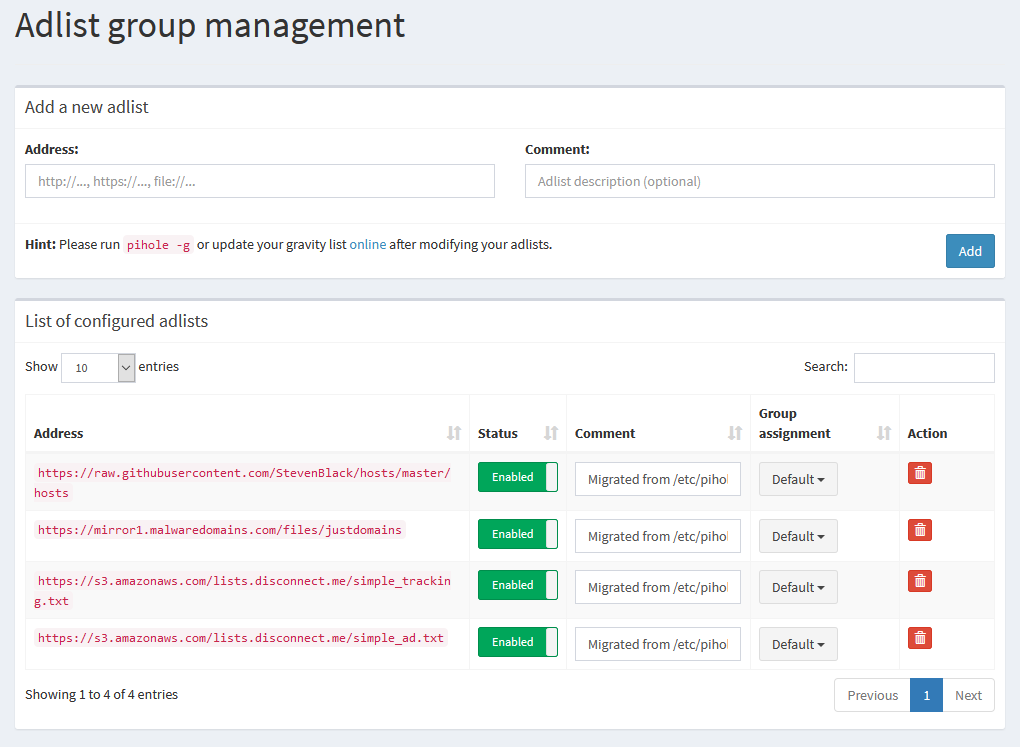
Previously, Pi-hole hid blocklist management under the Settings page. With Pi-hole 5.0, it’s got its own page under Group Management > Adlists. From here, you can enable, disable, or delete adlists that are already in the list, or you can add URLs to new lists yourself.
In order for your changes to take effect, you’ll have to update Pi-hole’s gravity list, either with pihole -g from the terminal, or Tools > Update Gravity in the GUI, so that it can pull down the new adlists
Existing feeds can be edited and managed from the DNSBL Groups sub-tab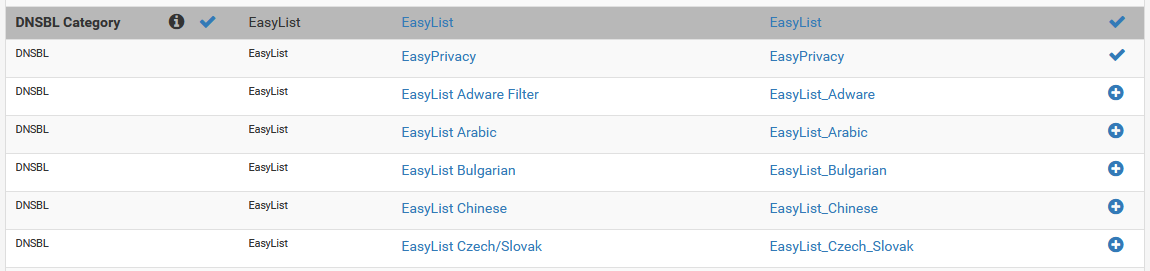 New feeds can be added via the Feeds tab
If you’d like to edit your existing DNSBL groups, you can navigate to DNSBL > DNSBL Groups, where you can edit or delete existing groups.
In order to add new groups, you can navigate to the Feeds tab, and scroll down to the DNSBL section. From there, you can click the + on the left next to a whole group to tweak group settings, and enable the whole group, or specific feeds from it. If you fancy adding one feed at a time, you can also click the + on the right next to each individual feed.
Be careful about adding too many feeds, since the more feeds you add, the more resources (particularly RAM), pfBlockerNG needs to run.
In order for your changes to take effect, you’ll have to update pfBlockerNG.
Enabling and disabling
The purpose of a DNS ad blocker is that when it’s running, it blocks ads, or tracking, or whatever you want. You rarely want to disable this, but doing so can be a good idea to determine if the blocking is causing problems with an application or website.
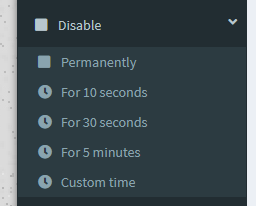
Pi-hole allows you to temporarily disable the adblocking service via the sidebar. Expanding the Disable option gives a list of times to disable for, or we can set a custom timeframe, after which, it will be re-enabled.

Once disabled, the sidebar will show a countdown timer, and clicking it will re-enable everything before that time runs out.
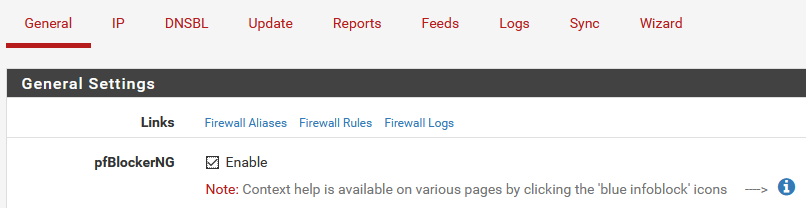
To disable pfBlockerNG as a whole, you can uncheck the pfBlockerNG option under the General Settings section on the General tab, and Save.
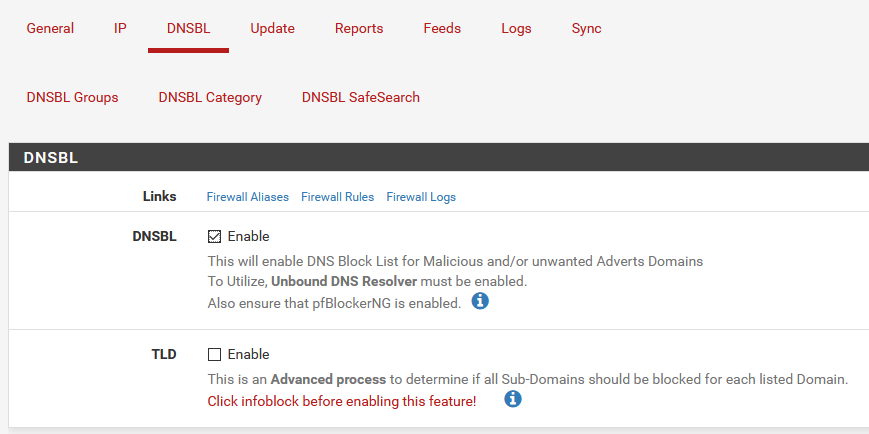
If you instead would like to only disable the DNSBL blocking, you can uncheck the DNSBL option under the DNSBL section on the DNSBL tab (In case you haven’t figured out, this disables DNSBL 😄), and Save.
Neither of these options have a timer on them, so you’ll have to manually re-enable them later.
Settings
There’s definitely more settings for tweaking everything, and for the most part, they’re a “set it and forget it” type of thing, and you won’t have to come back to them much, if at all. It’s generally important to know where these settings are though.

Pi-hole’s settings are all under the Settings option in the sidebar. The default page gives you a bunch of information about your system, including versions, interface information, memory stats, and DNS cache info.
At the bottom, there’s a “Danger zone” with buttons to disable logging, flush the ARP table, restart the DNS resolver, clear logs, or restart or shut down the whole system.
There’s also a Blocklists tab, which is where you’d edit the blocklists prior to v5.0, but this has since been moved to Group Management > Adlists.
On the DNS tab, you can change how Pi-hole works with DNS servers. There’s options here to change your upstream servers, select custom upstream servers, as well as defining advanced settings like conditional forwarding.
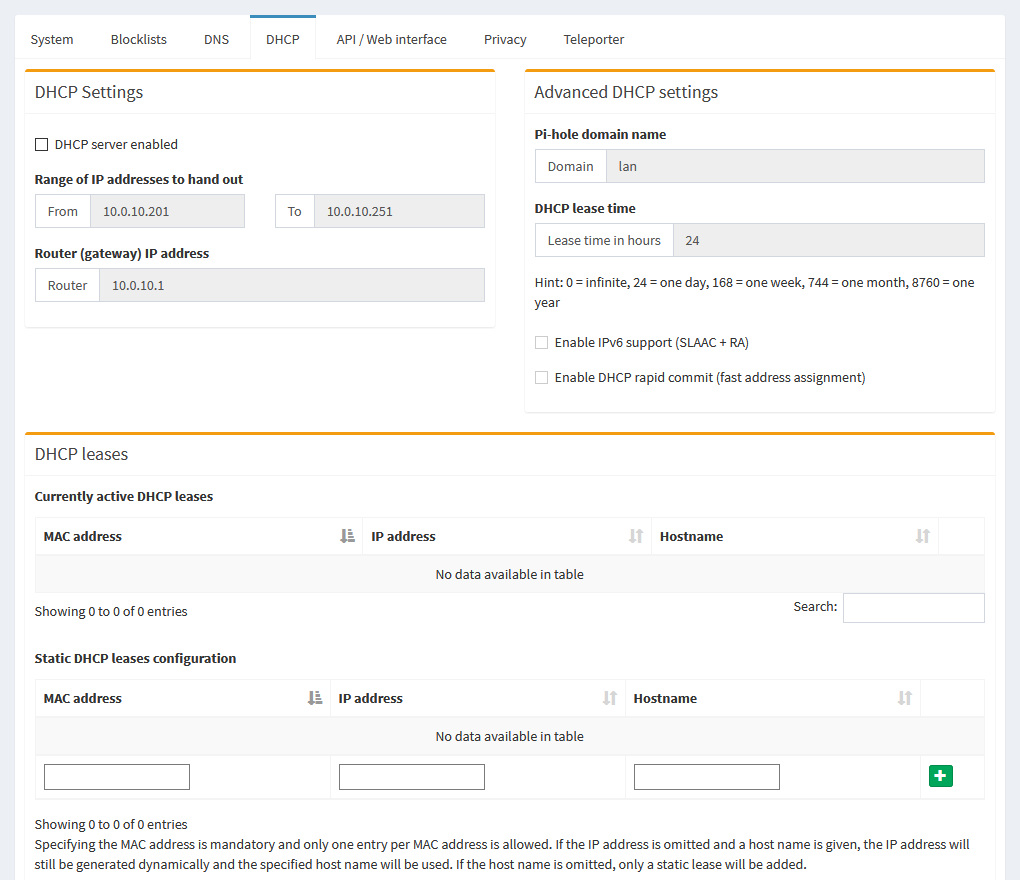
If you were using Pi-hole as a DHCP server, which would mean you’d have the DHCP service on your router disabled, you can tweak settings about what range it hands out from, and what info it tells clients to use, on this tab.
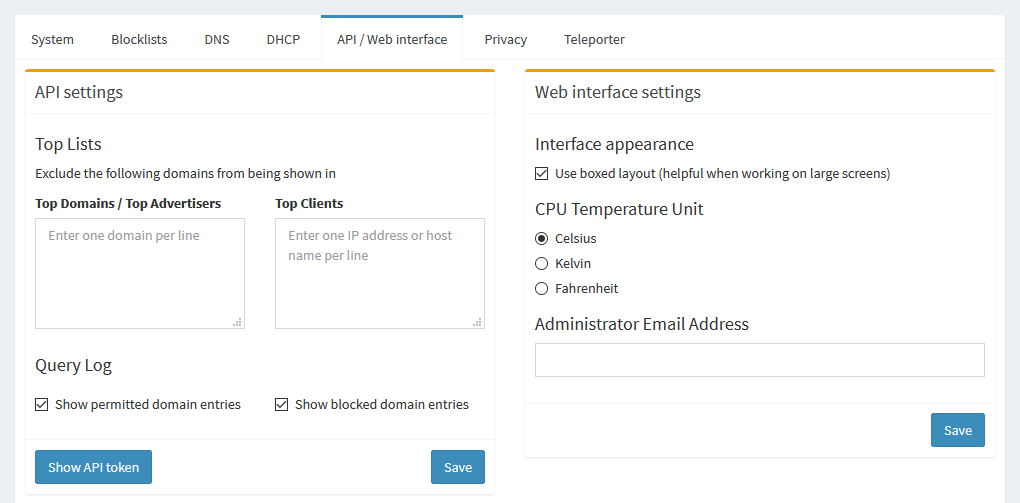
On the API / Web Interface tab, you can change the temperature unit for the CPU temp in the sidebar, add an admin email, exclude domains or clients from showing up in the GUI in the lists and graphs, or view API tokens.
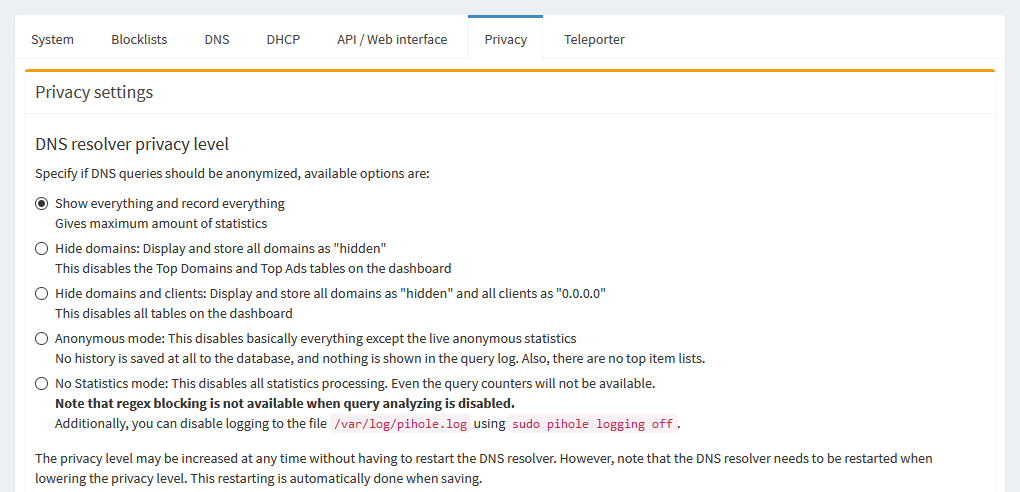
The Privacy tab lets you determine the privacy level of the queries, as far as anonymity level and how much gets logged.
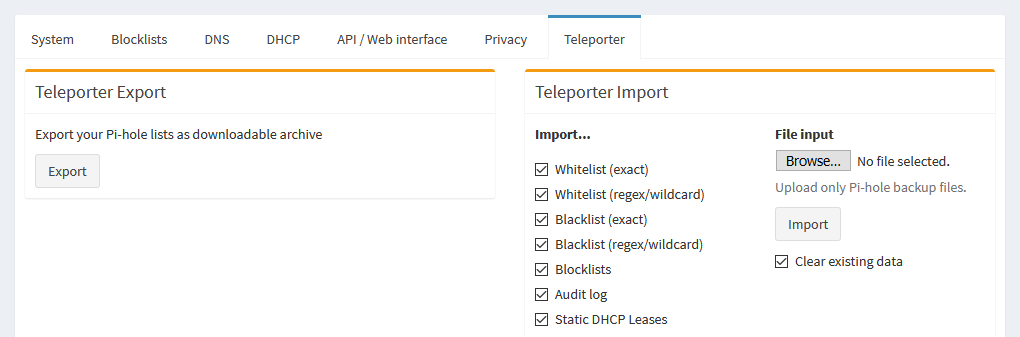
The Teleporter is where you can export backups of query data, and import them should you reinstall Pi-hole, or move it to a new system.
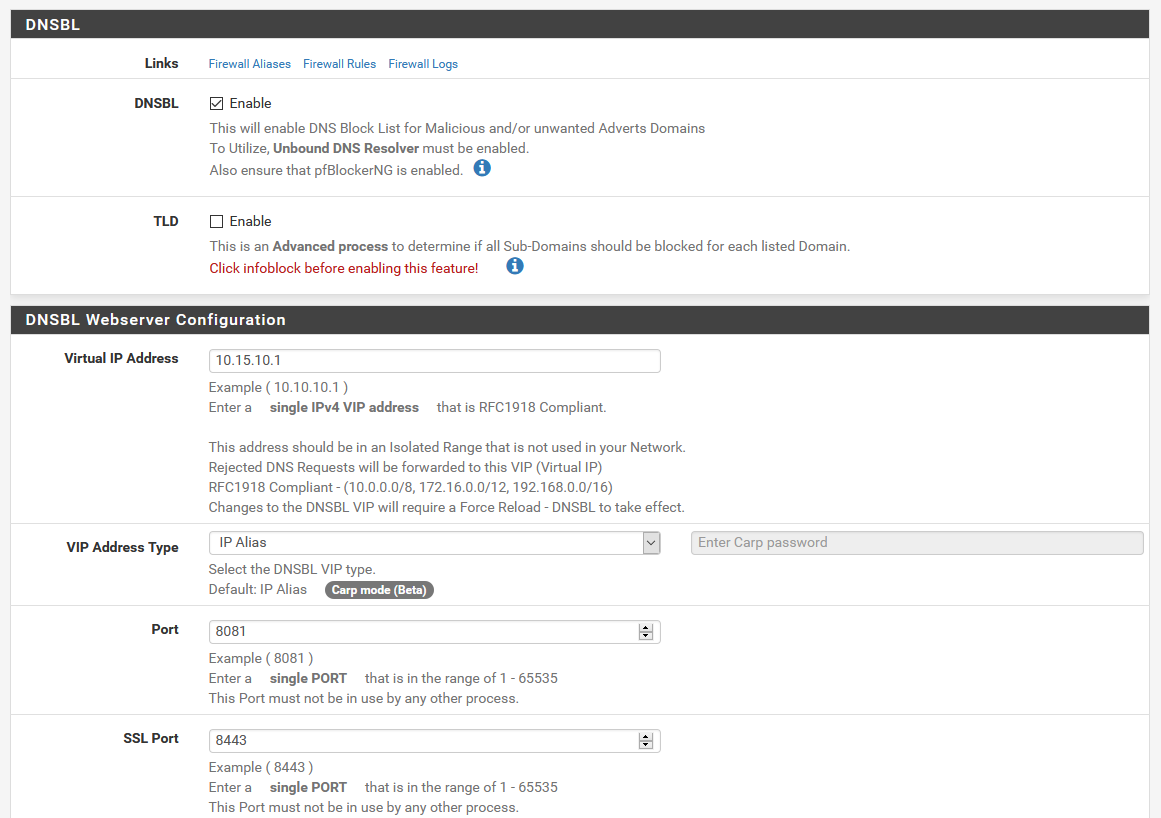
The main settings for the DNSBL portion of pfBlockerNG can be found under the DNSBL tab. Here, you can change settings for the virtual webserver, the general DNSBL settings, or tweak the whitelist or exclusion lists.
For the more general settings for pfBlockerNG as a whole, you can poke through the General tab. There’s a ton of other options in some of these menus, which I go over in much more detail in part 3 of this DNS tutorial, where we installed pfBlockerNG to replace Pi-hole.
Updating
For the most part, you won’t have to touch this, but occasionally, you’ll have to eventually update things.

Pi-hole’s adlists aren’t updated automatically as far as I can tell. They tend not to change much, but you’ll have to manually update them in case they do. For this, you can either navigate to Tools > Update Gravity in the sidebar, or you can run pihole -g in the terminal.

Occasionally, you’ll run into a scenario when there’s an update to Pi-hole itself, the web interface, or FTL, in which case, you’ll see an “Update available” message in the footer on the web GUI.
Because these updates involve the Pi-hole system as a whole, or the web GUI itself, you can’t self update from the web interface, since these updates typically need to replace parts of the web GUI, or restart it, or the Pi-hole service entirely. In order to actually perform these updates, you’ll need to issue pihole -up from the terminal.
This update also takes care of checking on adlists, so you won’t have to update gravity later, since it’s done for you during the system update.
So what’s next?
That’s basically everything Pi-hole can do, but what about everything else? There’s a whole bunch more options and settings in pfBlockerNG that I don’t know what they do yet!
I hear you! pfBlockerNG is a fairly extensive package, and it does a lot of stuff besides just DNS blocking. So what exactly, can it all do?
TLD White/blacklisting
The first thing people think of with TLD blocking is to block all of a given TLD, such as all .com domains. While you can do that, this TLD blocking has a lot more flexibility.
TLD blacklists can be used to block entire TLDs, like .xyz. TLD whitelisting can only be used in conjunction with TLD blacklisting to allow access to domains that are being blocked by a TLD blacklist.
The dev, BBcan177, explains it like this:
When the TLD option is enabled, it will automatically determine if a domain and all sub-domains should be blocked.
If example.com is added with TLD, then example.com and all are blocked.
If you add example.com to the DNSBL whitelist, then that domain will not be blocked. And the same with its sub-domains. If there are any other individual sub-domains of example.com in your block lists, then only those sub-domains will be blocked.
When you add .example.com (note the leading .), that will wildcard whitelist example.com and all sub-domains.
When you add example.com to the TLD exclusion with TLD enabled, that would stop example.com from being added as a wildcard blocked domain. So only the specific domains/sub-domains of example.com will be blocked. So with TLD Exclusion, you could stop a wildcard block of a domain, and then also add example.com to the DNSBL whitelist to allow example.com but still block any listed sub-domains that are in the feeds.
That’s a lot to take in. Basically, TLD white/blacklisting when used in conjunction with specific block rules in the feeds, gives you a ton of control about how certain domains are blocked. BBcan177 explains it in a bit more detail on this Reddit thread and on the Netgate forums.
IP blocking

IP blocking, and sets of firewall rules can be configured. By default, when you install pfBlockerNG, this gets enabled. This allows it to perform more advanced rules. Some of the filters include blocking things via the firewall, to keep malicious stuff out of your network.
GeoIP blocking
If you wanted to, you can also handle geographical blocking of IPs. This is a bit more advanced, and requires you to enter a MaxMind license to enable it, but you can use it to do things like disabling access to any IP in Russia, for example.
Policy-based routing
If you have a multi-WAN setup, or use a VPN, policy-based routing can be useful for dealing with traffic flow. Sometimes, you might hit a site that doesn’t respond well to a VPN, or you might want to direct traffic from most sources through one WAN interface, but specific clients or different subnets through another.
Conclusion
So, clearly, pfBlockerNG can do a lot more than Pi-hole, so that means I should install pfBlockerNG, right?
Not exactly. pfBlocker is indeed more powerful than Pi-hole in general, but that’s not always the best solution. If the only thing you want is a dead-simple DNS-based adblock solution, Pi-hole is probably the better choice.
If you like playing around, and don’t mind the extra setup steps, or the involvement of pfBlockerNG, you can certainly go that route, and it can definitely be used solely for DNS blocking to replace Pi-hole.
Personally, while I like the simplicity of Pi-hole, I love being able to consolidate everything into pfSense, and love how pfBlockerNG is working. For those of you like me, who don’t mind a bit of a challenge, or those of you that perhaps would like to use some of the other features of pfBlockerNG to supplement your network security, it’s definitely worth a shot. If this sounds like you might be in over your head, you may want to stick with Pi-hole.
Ultimately, the choice is up to you. They both have their strengths, and they both have things that maybe the other one does slightly better. Use this comparison to help your judgement, and decide for yourself!