
Wrangling DNS on Your Network, Part 2: Forcing pfSense DNS
This is part of a multi-part series on DNS.
In part 3, we replace Pi-hole with pfBlockerNG to attempt to put all our DNS stuff on one device.
An addendum
In part 1, we set up Pi-hole for ad blocking, and set pfSense for local DNS with the DNS resolver. In setting this up, there was an oversight that I’ve made. DNS over TLS is definitely an option, so let’s fix that and set it up now.
I’m going to assume you’re using Cloudflare, as that’s what I’m using, for upstream DNS. As long as your preferred provider supports DNS over TLS, you can swap your own in. Just substitute Cloudflare for your preferred servers.
First off, make sure your DNS is set up properly. Head to System > General and add your DNS servers like so:
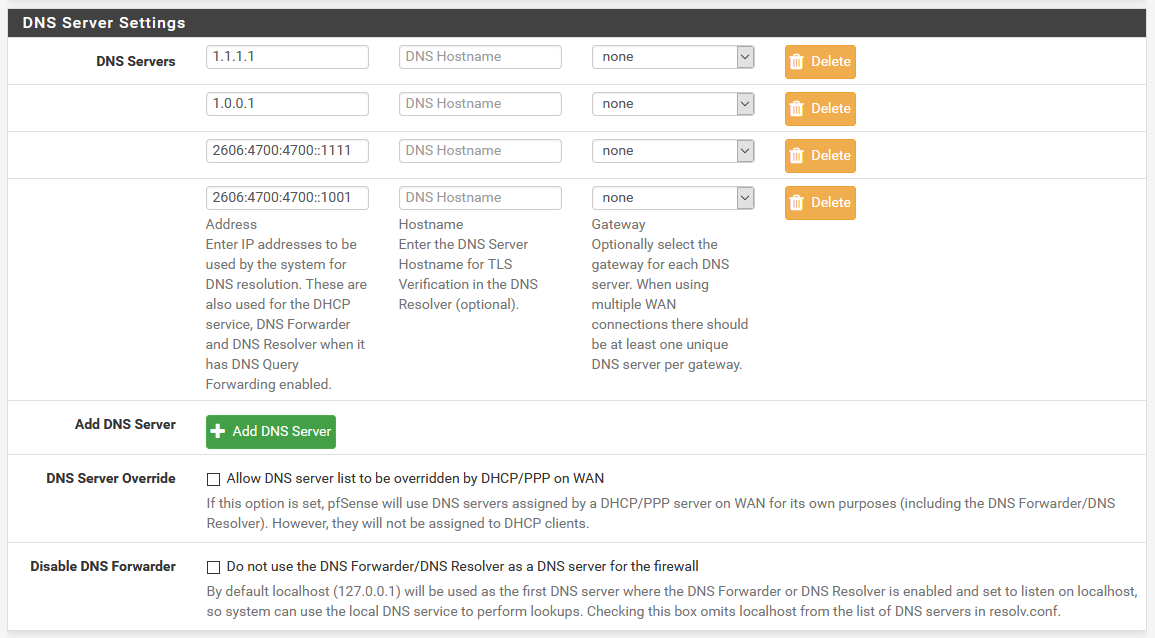 Set your DNS to Cloudflare, or whatever your preferred provider is
Next, go to Services > DNS Resolver and check on a couple of options:
- Enable Forwarding Mode: Checked
- Use SSL/TLS for outgoing DNS Queries to Forwarding Servers: Checked
Once you Save, you should be all set with DNS over TLS!
On to the DNS forcing…
So we previously set up Pi-hole for DNS adblock, and pfSense to handle local hostnames. Now that adblock is happening everywhere, there’s another slight problem you might run into. You might notice that DHCP is handing out the correct addresses, and clients are being told to use Pi-hole for the DNS servers. And if you’re running static stuff like server VMs and such, you have the correct statically-assigned DNS servers too!
So then, why does your Alexa still have ads when you listen to music?
The problem that we’ve run into here is that some devices, even if you tell them what DNS servers to use, hardcode their own DNS servers anyway, and don’t listen to the DHCP offerings. The good news is that there’s a solution to this problem.
Let’s learn about NAT
The important thing to know about here to force DNS is to know how your router works.
When you connect to the internet, your ISP hands you a public IP address that can be used to contact you, and let you contact others. In most cases, unless you’re paying for a business or something similar, you probably only get one of these addresses, since there’s a limited number of them to go around.
But when you connect to the internet, you have more than one device behind your network, so how exactly does this work if you only get one public IP?
Every connection you make to somewhere is not just an IP address. Every service, like a web page, or a game server, or SSH, or FTP, runs on a given port. Each connection that you make to somewhere, whether it’s local on your network, or public on the internet, uses a combination of an IP address and port to connect to. This connection is called a socket, and looks something like 174.28.36.117:22, where the port is after the IP address, separated by a colon.
The problem with this approach, is that behind your network, since you have multiple devices, your router can’t just translate the IP address, since you might have multiple devices that run stuff or make requests on the same port. To avoid this conflict, your router randomizes these ports when it sends requests out. If you access a website on your laptop, and another on your phone, both of those private IP addresses are sending out a request on port 80. Your router, to translate this to one public IP, obviously can’t translate both to port 80, or it won’t know which device to send the packets back to when it gets a response.
To fix this, your router randomizes the ports. Your router might translate port 80 on your laptop to port 50000 on the WAN side of your router on the way out, and port 80 on your phone might get translated to 50001. This process, known as Network Address Translation ensures that your router knows what traffic to send where, even though dozens of devices on your local network seem (to the internet) to be coming from the same public IP address your ISP hands you.
What about incoming connections?
For outgoing connections, ports are randomized. This works on the way out, and since your router tracks these, it’ll know where to send return packets on the way back in. “But what if you’re hosting a Minecraft server, and you need incoming connections to work?” you say. If you host a server on a computer on your network, and people connect to your public IP on port 25565, it won’t work. Why? Because that connection was initiated from the outside, so your router doesn’t know where to send the packets.
The solution to this is what we know as port forwarding. To fix this, we can create a port forwarding rule, to tell the router “Anything on port 25565 coming in, send to 10.0.0.50 on port 25565” and suddenly, your Minecraft server works, and people can play with you.
So how is this relevant to forcing DNS?
This might not immediately seem relevant, but the key here is that to make a port forwarding rule, it needs to know what interface to listen on. In pfSense, this defaults to WAN, but we can change this.
There’s a process commonly known as reverse NAT that we can use here. What if instead of creating a port forward rule on WAN, we make one on the LAN interface? And what if we listen on port 53, and forward it to 127.0.0.1:53? That rule does exactly what it sounds like. It means that instead of DNS requests to servers like Google’s 8.8.8.8, this NAT rule captures this request. Since this request is listened to on the LAN interface, on port 53, it gets captured, and pfSense forwards it to itself on port 53. And this means that the DNS request is answered by its own Unbound DNS resolver.
To set this up, we need to change a few settings first.
Before we add the port forwarding rules, make sure the Unbound DNS resolver is configured to bind and answer queries, either on Localhost or All interfaces! Things will break if you don’t do this first.
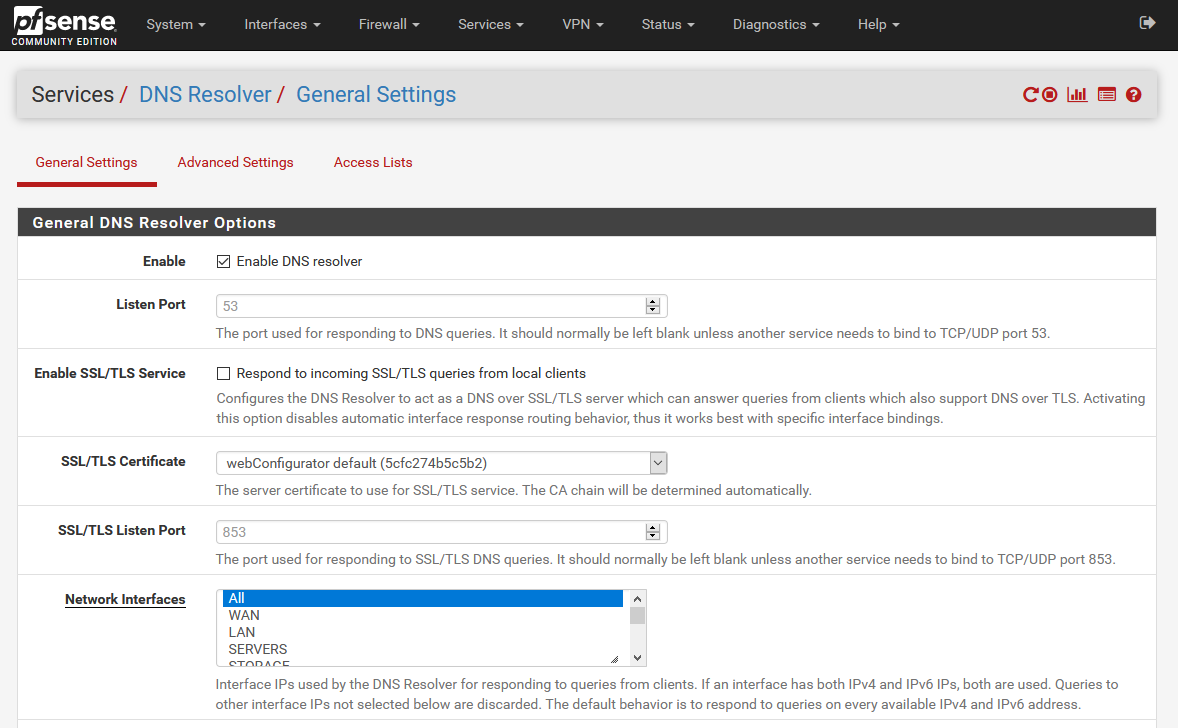 Make sure 'Network interfaces' is set either to 'All interfaces' or 'Localhost' here.
If you need to make changes here, change the Network interfaces option to All interfaces, and click Save at the bottom.
Next, head over to Firewall > NAT > Port Forward and click ↑ Add to add a new rule to the top of the list. I’ll assume you’re using the LAN interface here, but if you’re using several VLANs on one interface, use the VLAN interface instead, and repeat for each VLAN. Fill the rule in as follows:
- Interface: LAN
- Protocol: TCP/UDP
- Destination: Invert Match checked, LAN Address
- Destination Port Range: 53 (DNS)
- Redirect Target IP: [Your LAN IP]
- Redirect Target Port: 53 (DNS)
- Description: Redirect DNS
- NAT Reflection: Disable
- Filter rule association: Create new associated filter rule
When you’re done, the rule should look like this:
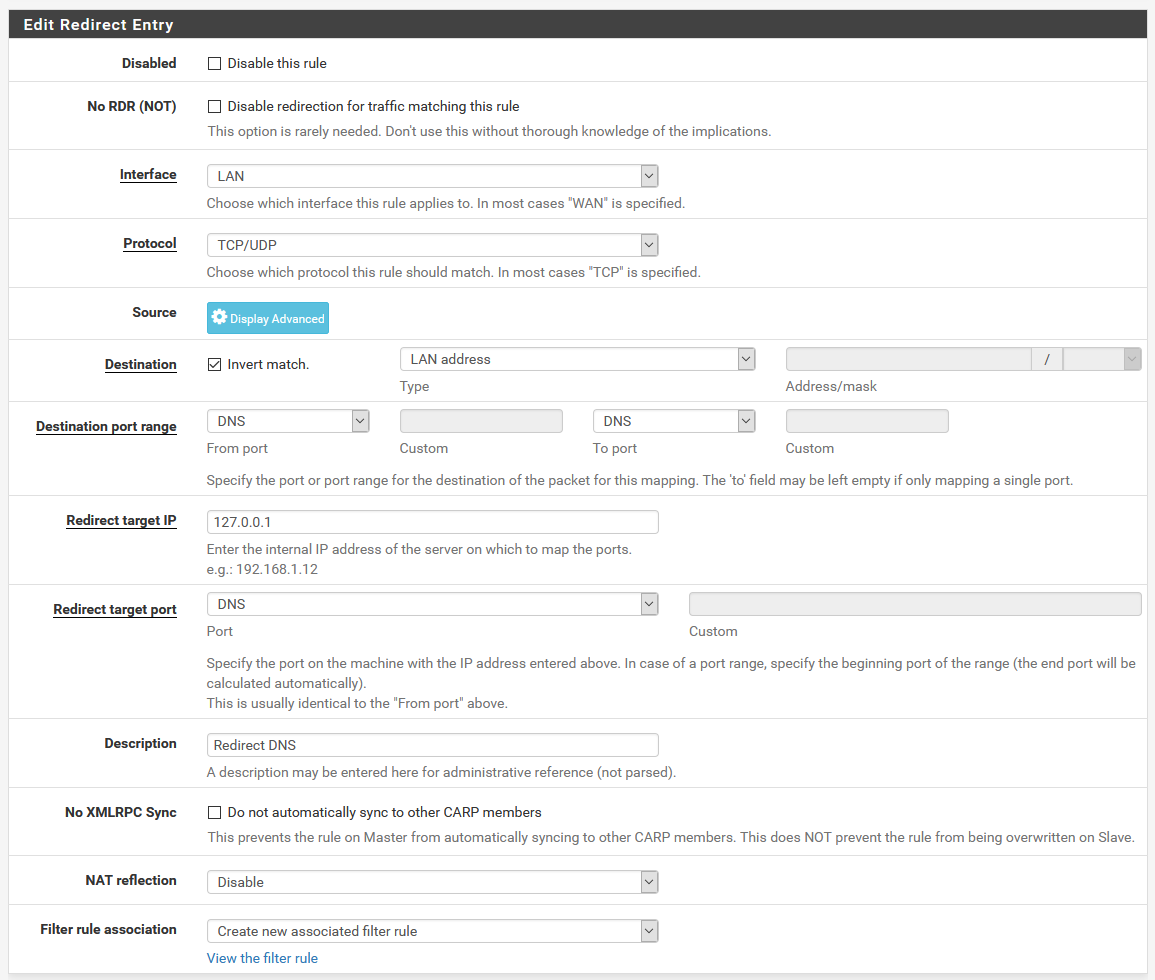 The resulting port forward rule
In order to completely block external DNS servers, we have to add one more firewall rule. Navigate to Firewall > Rules and choose whatever tab you’re using for the interface you’re configuring this on. From there, find the firewall rule that we just created with the port forward, and click the copy icon to duplicate it. Change the settings as follows:
- Action: Block
- Destination: Any
The resulting two firewall rules should be at the top of your list for your interface, and should look like this:
 Make sure you have the allow rule above the block rule, otherwise DNS won't work!
If you’re running multiple VLANs, or you have other interfaces you want to apply this to, you’ll have to create separate NAT and firewall rules for each interface, just like we did above.
Bonus tip! Allow some DNS sources
If your setup is like mine, you might not want to necessarily restrict DNS to only pfSense, as we currently have Pi-hole doing ad blocking. In this case, you can create an alias in the firewall with allowed DNS addresses, and instead of defining LAN address in the port forward rule, we can define the alias instead. This way, instead of matching and redirecting all DNS traffic that’s not to the pfSense interface address, we can make an alias that’ll allow it to only redirect DNS not matching either the Pi-hole, or the pfSense interface.
If you want, you can also tweak the redirect from your LAN address, and put the Pi-hole address instead, to force DNS to go through the Pi-hole. This could be useful for things like Google Home, or Alexa devices. The only downside is that if the port forward forcibly redirects DNS to Pi-hole instead, DNS will stop working if the Pi-hole is down for some reason.