
Wrangling DNS on Your Network, Part 1: Pi-hole
This is part of a multi-part series, in which I tackle setting up and configuring DNS on the network.
In part 2, we force DNS to be routed through pfSense to prevent devices from using their own DNS in place of the ones handed in DHCP.
This is still ongoing!
So if you’re like me, you hate ads. Your first idea for a solution might be to add a browser-based adblock solution. And if you’re thinking that that would work, you’d be right. But it’s a very localized solution, since you’d need an adblock solution on everything you used. Every browser, every device, you’d need a new adblock extension, since it’s local to that machine. And that doesn’t cover apps on your phone that you can’t install adblock for. Or smart home devices.
Enter Pi-hole. Pi-hole is a DNS-based solution for handling adblock, and because it’s DNS-based, not only does it work on every device, and every app, but it also makes your internet slightly faster, since it knocks down the ads at a network level before they even load into your app or browser.
So, set Pi-hole to be the DNS server for all devices on your network, and you should be all set, right? It’ll use your favorite upstream public DNS server, whether that’s Google, Cloudflare’s quad 1, Quad 9, or some other server, and then your devices reference it, and it knocks down the ad domain requests. In most home situations, that would work, and it would work really well, but there’s some more advanced configuration we can do here.
But I’m a homelabber, what about my local machines?
Okay, so you’re like me, and you’re running a bunch of servers and VMs. That’s okay, we can set those to use Pi-hole as well if you’d like. But what if you don’t want to remember IPs and ports? What if you want to set up a reverse proxy, and instead of typing 172.18.24.67:32400 or whatever your IP is, what if you just want to remember plex.mydomain.com?
The solution here is to add your own custom DNS entries to the list. This is certainly doable in Pi-hole, but it’s only really easy if you’re running v5.0, since there was no GUI before then. Should you choose to do this in Pi-hole, you can navigate to “Local DNS records”.
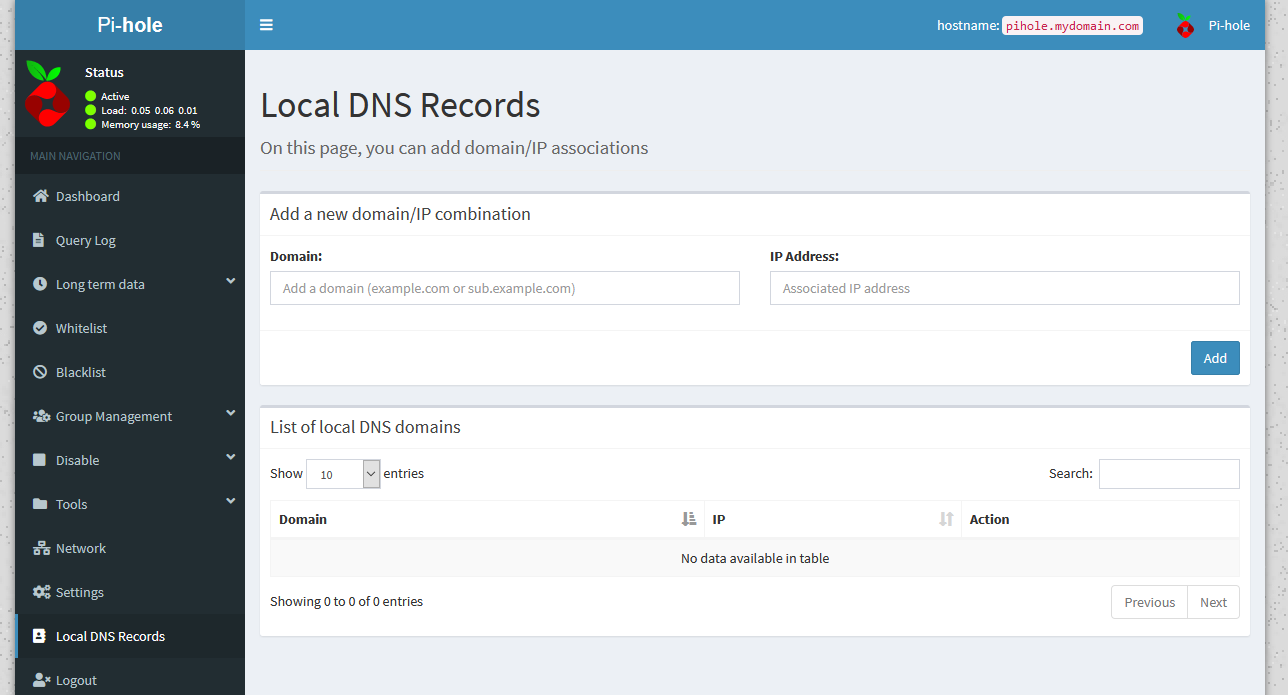 Pi-hole's 'Local DNS records' page
Using Pi-hole, you can add a domain, or subdomain, and an IP address, and add your own DNS records in this way. As you can tell, I don’t have any in my list at the moment. That’s because I’m using a slightly different solution here.
Local DNS with pfSense
The second solution to this problem (that is, the one that’s not local DNS with Pi-hole) is to do this local DNS stuff through some other service. The next best thing aside from a separate DNS server here, is to handle this on the router level.
In my case, I’m using pfSense as my router, and to do this there, we have to enable the DNS resolver. Go to pfSense’s IP, and log in if you haven’t already. Once you’re there, go to Services > DNS Resolver, and at the top, you’ll see a checkbox that lets you enable it. If that’s not already checked, check it, scroll to the bottom, and hit save. This should enable the DNS resolver, and let pfSense respond to DNS queries on port 53.
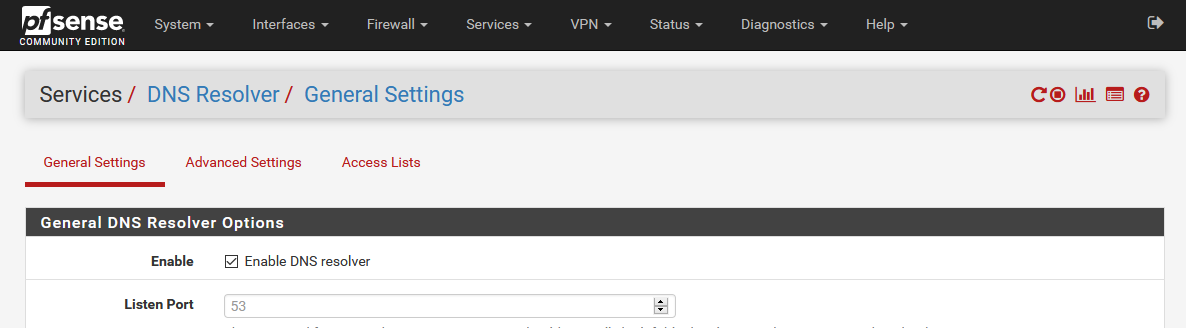 pfSense's DNS resolver page
From here, the process is very similar to Pi-hole’s, except we get a few more options. To add an option, from this DNS resolver page, scroll to the bottom of the page, and hit the button for “Add” below the “Host Overrides” section.
This brings you to a new page, where you can fill in the details of the host you want to add, just like we did with Pi-hole.
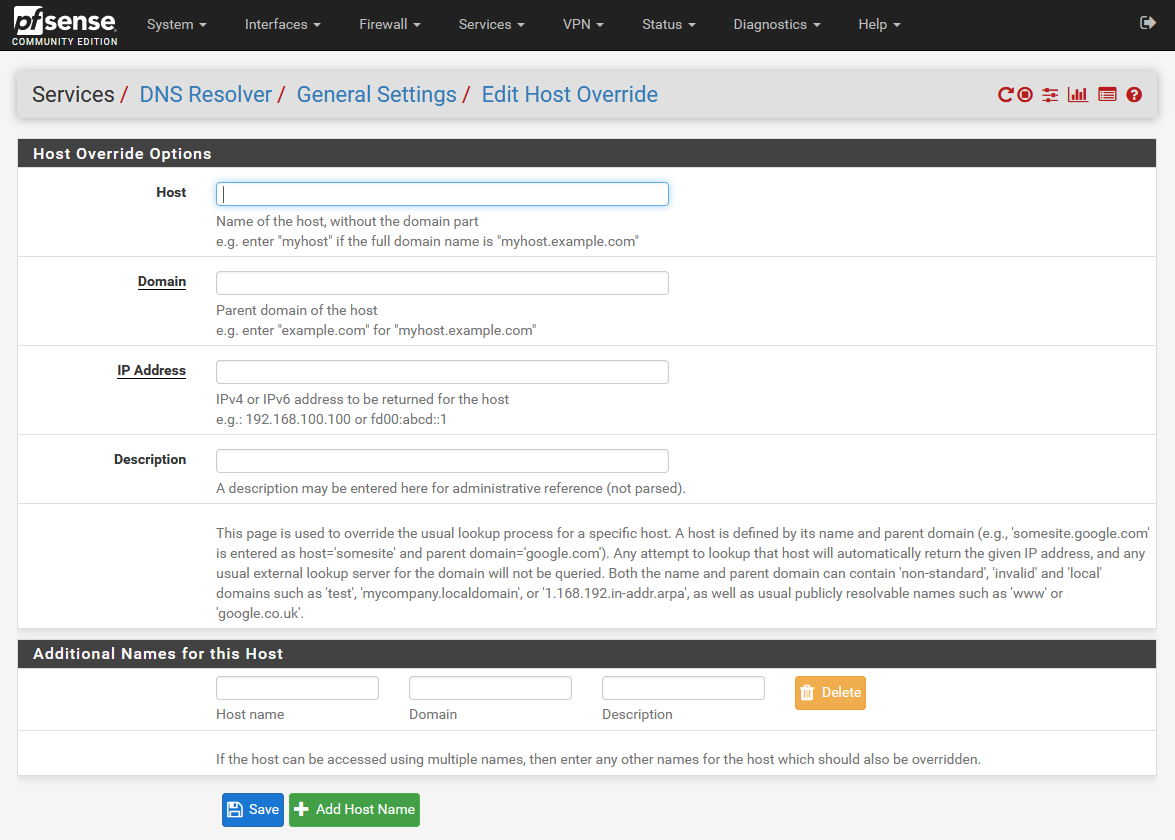 pfSense DNS resolver's 'Host override' page
In pfSense, instead of just one box for the input domain, this is split between domain, and hostname. If we were to enter desktop.mydomain.com in Pi-hole, in pfSense, we would instead make the domain mydomain.com, and make the hostname desktop, and pfSense will concatenate these together. To just make an alias for a domain, without a subdomain, just leave the hostname blank.
Once you add a bunch of these entries, it can get confusing as to what these are all for, so pfSense provides a field to enter a description as to what this is for. This isn’t parsed, and you can enter anything you want here. This is nice, and it’s a feature Pi-hole doesn’t seem to have just yet. Hopefully this’ll be coming in the future.
If you have multiple services on one server, or are using a reverse proxy, where you might otherwise want multiple domains to resolve to the same IP. In this case, instead of maintaining several entries, and in the case of an IP change, having to edit 3,4 or 5, or even more entries, pfSense gives us the option to add an alias to the host override entry. This means if/when the IP changes, if you move a server or service, you only have to edit one IP in one entry.
To do this, in the bottom under “Additional Names for this Host”, add the additional hostname, domain, and optional description. If you have more than one alias, hit the Add Host Name button near the bottom. When you’re done with everything, hit Save.
Pi-hole has definitely come a long way here, and their recent addition of a GUI option to add custom DNS records in v5 is a step up over what used to involve manually editing the dnsmasq files, but I really hope they let us add a description, or add aliases. pfSense definitely has the edge here for ease-of-use with configuring this.
But wait! Now I have adblock on one DNS server, and local DNS names on another! How can I fix this?
Okay, so if you took my approach, and configured your local DNS names on pfSense, we’ve run into a slight issue. Both pfSense and Pi-hole are configured to route upstream to public DNS. Whatever server you choose there is up to you, but since neither reference the other, we can’t have our cake and eat it too. Anything we connect, assuming we’re using our custom DNS, and not just letting DHCP assign public DNS to our clients, is either going to be using pfSense, and be able to resolve local DNS names for services like Plex, or it’ll be using Pi-hole, and get the benefit of adblock.
Okay, it’s fine. We can fix this. The solution here is that we need to chain these together, so one of these servers needs to reference the other as upstream. The logical solution here would be to make the pfSense install the master one, and have Pi-hole reference it, as opposed to the other way around. Given that pfSense needs everything to route through it to get to the internet anyway, it’s kind of pointless to make the Pi-hole the upstream, because then pfSense would reference Pi-hole, and then the Pi-hole would have to route back through pfSense to get to public DNS.
The solution isn’t as difficult as it might seem, but it’s not exactly straightforward. You’ll want to navigate to Settings on the left hand nav menu, and then in the top tabs, click the DNS tab. You’ll see something like this.
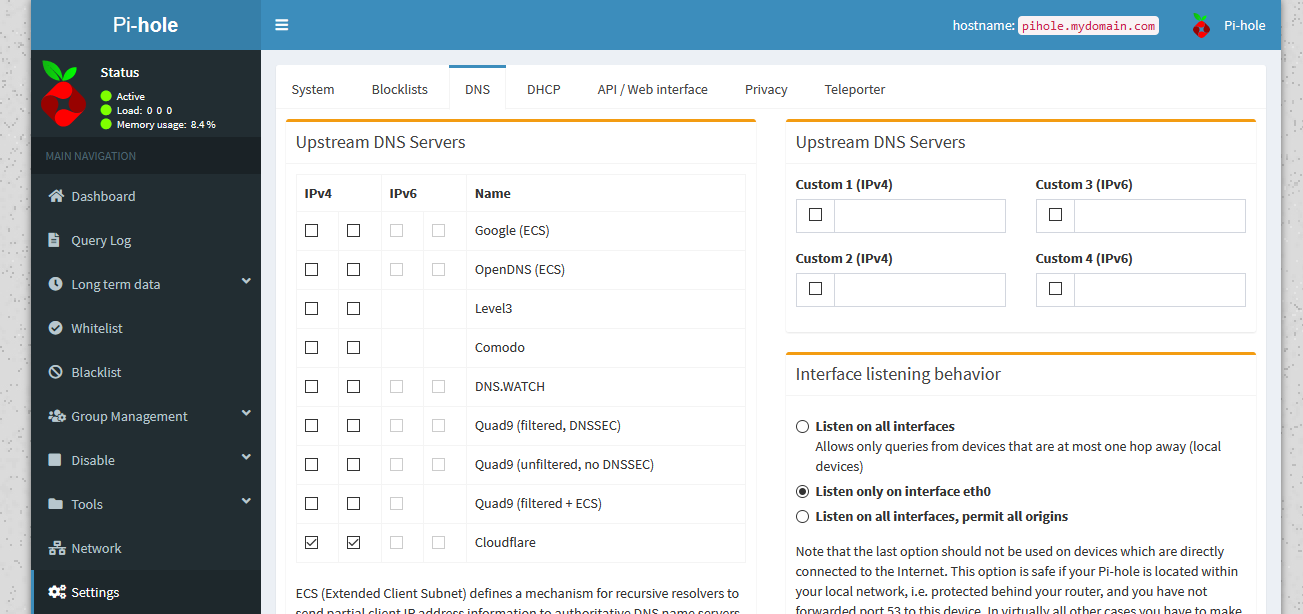 Pi-hole's DNS settings
I’m using Cloudflare’s DNS here, but you may have chosen a different server, or set of servers during setup. Here, we want to do two things. First, uncheck any DNS servers on the left hand side. Then, we need to add our own DNS server. On the right, under “Upstream DNS Servers”, we want to add our pfSense resolver. In my case, my IP is 10.0.10.1, but you’ll use whatever the default gateway for your Pi-hole is. Even if your devices are on a different VLAN, we need this to be the interface the Pi-hole uses, so add whatever interface you need to.
If you haven’t touched the port settings for the Unbound DNS resolver in pfSense, you’ll be using port 53. If you changed it for some reason, use whatever port it’s running on. To fill this in, we want to check the box next to Custom 1, and add in 10.0.10.1#53, substituting your own pfSense IP and DNS port number.
At this point, you’ll see something like this:
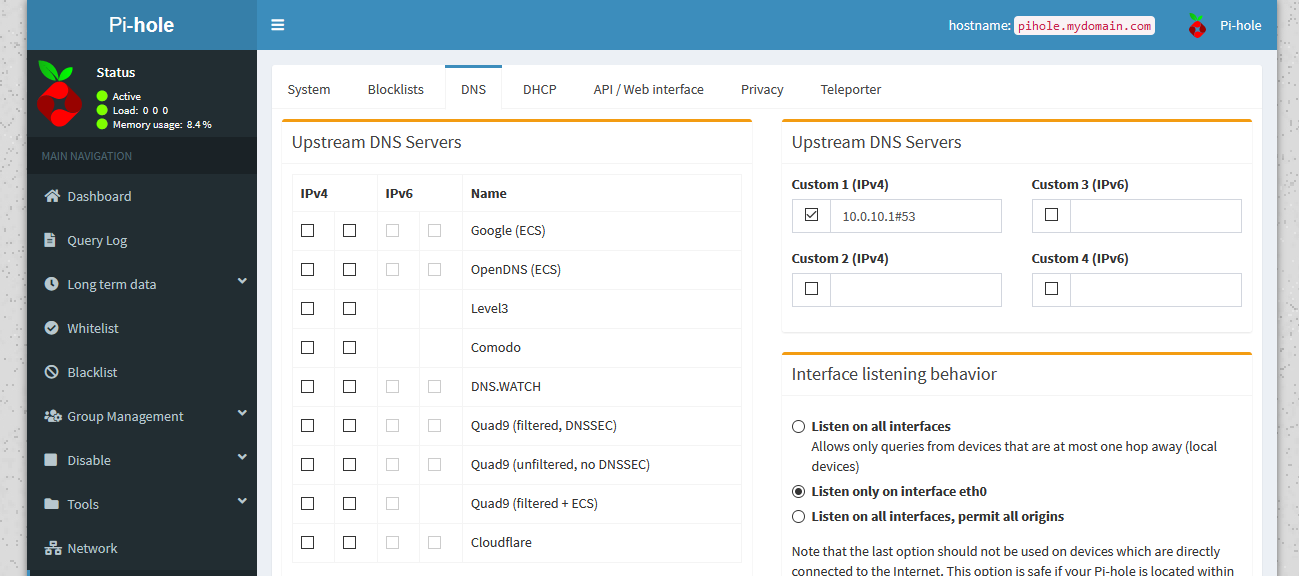 Our new DNS settings
While we’re here, we might as well solve one more problem. If you’re in this scenario, since we have pfSense as the “master” sort of DNS with the local entries and all, I’m going to assume you also use pfSense for DHCP, and not the Pi-hole. If that is the case, the Pi-hole won’t know what devices are what, and won’t be able to resolve DHCP hostnames. To fix this, scroll down to the advanced section.
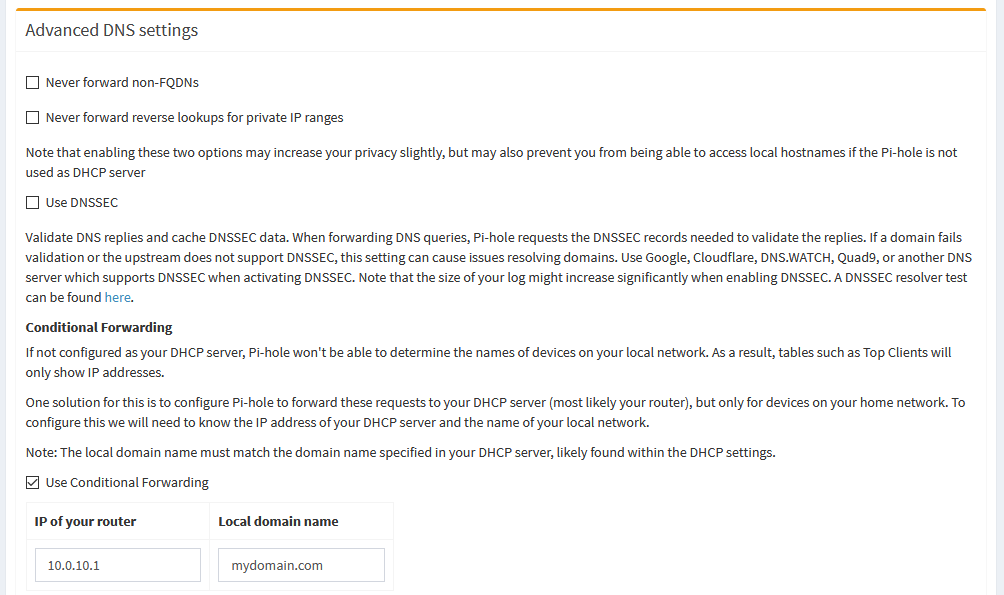 Pi-hole's advanced DNS settings
Down here, you want to leave the top two boxes unchecked. The third one is for DNSSEC. We’re not using upstream public DNS anymore, so this setting is dependent on pfSense. If you’ve configured pfSense to use DNSSEC for the Unbound DNS resolver, you can check that box. Otherwise, leave it unchecked.
The important part is that the Pi-hole needs to know where to get DHCP info, so you want to check the box for conditional forwarding. Then, fill in the pfSense IP and local domain. This IP should be the same as you used in the custom DNS entry up top. From here, you can save, and Pi-hole will be able to forward local queries onto pfSense to be able to resolve those DHCP hostnames.
At this point, you should be all set! You now have two DNS options. pfSense as the master for the normal DNS queries, and Pi-hole if you want adblock. Personally, I let DHCP hand out Pi-hole to my wireless clients, including IoT, and I use them on my desktop and laptop and all that. For servers, like some of the VMs I run, I set pfSense as upstream DNS, since it eliminates an extra hop, and I don’t need adblock in a server CLI environment, anyway.
Bonus tip! Fix that pesky pi.hole default domain!
Pi-hole by default resolves itself on the network at pi.hole. This is kind of dumb, cause you can’t normally change this. Your first instinct would be to set a DNS host override in pfSense to let pihole.mydomain.com resolve to the Pi-hole IP, but the problem is that it still doesn’t want to play nice on a domain. Your options are either the IP, which warns you about meaning to go to /admin unless you explicitly type in 10.0.10.53/admin in your browser, or, you can go to pi.hole and it’ll resolve to the admin page automatically.
The host override means that pihole.mydomain.com now resolves to the Pi-hole IP, but the Pi-hole still doesn’t like it, and won’t respond properly. The solution here is to also set the hostname of the Pi-hole itself to pihole.mydomain.com as the full domain, as opposed to just calling it pihole.
Depending on your configuration, this might mean something like hostnamectl on a VM running Pi-hole, or editing a Docker container if you’re going that route. Either way, once that’s done, and you have both the changed hostname on the Pi-hole, and the host override in the pfSense DNS, then you’ll be able to type in pihole.mydomain.com into your browser, and it’ll redirect to /admin just like it did for the default pi.hole domain.